Loading...
Loading...
Loading...
Loading...
Loading...
Loading...
Loading...
Loading...
Loading...
Loading...
Loading...
Loading...
Loading...
Loading...
Loading...
Loading...
Loading...
Loading...
Loading...
Loading...
Loading...
Loading...
Loading...
Loading...
Loading...
Loading...
Loading...
Loading...
Loading...
Loading...
Loading...
Loading...
Loading...
Loading...
Loading...
Loading...
Loading...
Loading...
Loading...
Loading...
Loading...
Loading...
Loading...
Loading...
Loading...
Loading...
Loading...
Loading...
Loading...
Loading...
Loading...
Loading...
Loading...
Loading...
Loading...
Loading...
Loading...
Loading...
Loading...
Loading...
Loading...
Loading...
Loading...
Loading...
Loading...
Loading...
Loading...
Loading...
Loading...
Loading...
Loading...
Loading...
Loading...
Loading...
Loading...
Loading...
Loading...
Loading...
Loading...
Loading...
Loading...
Loading...
Loading...
Loading...
Loading...
Loading...
Loading...
Loading...
Loading...
Loading...
Loading...
Loading...
Loading...
Loading...
Loading...
In Pakk, you only need to maintain a single, canonical sales price, which we refer to as base price. This is the price from which all other prices are ultimately derived.
The level at which you set your base price depends on the nature of your business and how you intend to combine the other pricing features, but can largely be summarised as follows:
For business that are majority wholesale, or consider their wholesale prices as their ‘reference’ prices, then it makes sense to use the wholesale price as their base price.
For business that are retail oriented, then it makes more sense to set their base price at, or at least closer to, the final retail price.
Note that base prices in Pakk are always expressed exclusive of tax.
Pakk has lots of built-in fields to describe product attributes, for example:
Name
Shipping weight
Description
Brand
These attributes are generic, in that they should be applicable to most, if not all, customers and products.
But clearly we can't include every possible attribute for every possible product type as a built-in field - the product drilldown screen would quickly become unmanageable and your account would drown in fields that aren't important to your products or business.
Pakk solves this problem with custom product attributes. You've probably come across 'custom fields' in other e-commerce/ERP systems. The Pakk custom product attributes system is similar in a lot of ways, but packs in even more power.
The first thing you need to understand is that you don't set up custom attributes on the fly, as you are editing products - they need to exist before you can apply them to a product. So, custom attributes are an entity just like any other entity within Pakk - you access the list of custom attributes from the Setup menu. There you can list, view details, edit and inactivate - just as you can can any other record type.
So, if you've never set up any custom attributes in your account, head over to Setup > Custom Attributes now and have a play around. Nothing will happen until you actually start applying these to products, but we'll come onto that later.
There are a number of configurations that can be set up at the Account level, and optionally overridden for Brands and/or Websites.
Ticket Stages: specify custom stages that tickets can move through as they are dealt with
Assign New Tickets To: optionally assign a member of staff to incoming tickets as soon as they are created
Notify Assignee: if a member of staff is assigned to a ticket when it is created, you can choose to have them be sent a notification email
Tickets Sent From: a name and email address combination that will appear as the sender on emails sent out by your help desk. You must set this to the forwarding email address you have set up to route emails to your help desk.
You need to set up your customer service email address (or addresses) to forward to dedicated 'inbound' email addresses which you obtain from your custom Postmark sub-account. Setting up email forwarding allows for the following functionality:
All emails sent to your customer service address will result in Tickets being created on the system.
Replies to conversations by admin users made from within Pakk will be emailed out to customers.
Replies by customers sent by email will be ‘attached’ to the Ticket.
As well as viewing outgoing and incoming email in your Pakk admin panel, you can get deeper insights into email issues from your Postmark sub-account
Taken together, this feature set allows you to manage all customer service conversations from within your Pakk account.
Inbound Email Setup
Log into your custom Postmark sub-account
Select your 'inbound stream'
Copy the server's 'inbound email address'
You will need to set up a forward from your customer service email to this address. This is done with your email provider, so the procedure depends on who you use for your email hosting. Reach out to us if you have any issues.
Webhook Setup
Whilst in your 'inbound' stream in your custom Postmark-sub account, you'll need to set up the server's inbound webhook URL
The format of the webhook is: https://{{yourwebsite.com}}/webhooks/inboundemail/v2 Replace {{yourwebsite.com}} with the URL of any of your Pakk sites.
The transactions that are shown are actually Journal Entry Lines. The system will show all Journal Entry lines that:
match the chosen Account
match the chosen Currency
fall between the start date and end date
have not already been reconciled
You will notice that the the lines are split up into 'Negative' and 'Positive' tabs to enable you to reconcile in two passes - for example, if you are reconciling a bank account, you can first reconcile deposits, then payments.
At this point you will probably go through your paper statement, matching each line to a line in Pakk. As you check the 'Reconciled' checkbox in Pakk, you'll notice that the 'total reconciled' field in the 'Totals' box will update, causing the the 'difference' field to also update. The 'difference' field is the most important subtotal to watch - this number represents the difference between the total of the lines you have reconciled and the amount the system expects you to reconcile as a result of the starting balance and ending balance you've entered. Here's a quick example:
Starting balance: £1000
Ending balance: £1500
Net total to reconcile: £500
Lines reconciled: Deposit £2000; Withdrawal £1700
Net total reconciled: £300
Difference: £200
In the above example, the reconciliation is still out of balance by £200. You would continue reconciling until the difference became zero, or in other words, the Reconciliation is in balance.
As you build the Reconciliation, you'll probably find that you need to go away from the Reconciliation in order to enter new transactions, or edit existing transactions, to make them sync up with the reality you are observing on your statement. This is no problem. You can 'Save' your Reconciliation at any time and come back to it when you are ready to continue. When you come back to an existing Reconciliation, you'll see the lines update to reflect any new lines you've entered on the system.
Also note that when viewing a Journal Entry (either manual or system created), you can see which lines have been reconciled and on what Reconciliation. Clicking on the name of the reconciliation will link you directly to that Reconciliation.
Once a Journal Entry line has been reconciled, no changes can be made to that line - you can't change the amount, the date, or even delete that line.
For manually created Journal Entries, this restriction manifests itself in an obvious way - if you attempt to manually change the contents of a line that has already been reconciled, the system will flag this up and will not let you save.
For system created Journal Entries, the restriction operates indirectly, because it is the parent Transaction that determines the Journal Entry lines. This means that if you attempt to make changes to a Transaction that changes the underlying Journal Entry in a way such that a line that has already been reconciled changes, you will get the same 'This change affects lines that have already been reconciled...' warning.
Take a concrete example.
A customer places and order and pays by direct bank transfer.
The payment is entered on the Sales Order record.
The system-generated Journal entry contains a line reflecting a positive entry against the bank account on the date of the payment.
Sometime later, the person responsible for bookkeeping in the company reconciles the bank account, sees the incoming payment from the customer and marks it as reconciled.
This has the effect of stating "this payment is no longer theoretical, it is reflected in the reality of the bank account".
A few days later, a customer service representative is editing the customer's order to reflect something that has happened and mistakenly believes they should also edit the recorded customer payment to reflect this change.
Since the payment on the order affects the underlying line in the Journal Entry which as already been reconciled, the system will not allow this and will show a warning when the user saves.
Keep this in mind: you can't change history. Reconciliations help ensure this maxim is enforced!
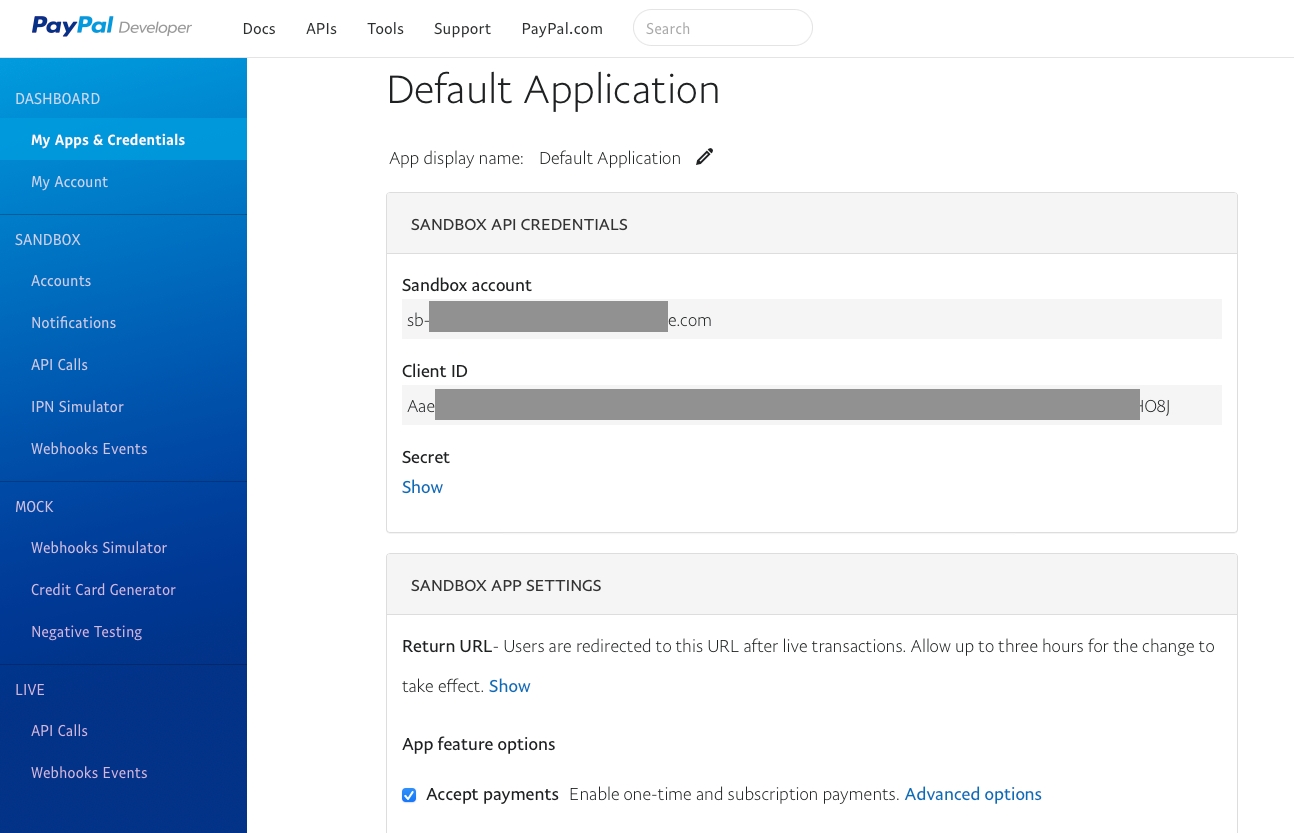
Once you've signed up for a Stripe account, log into your Stripe admin dashboard. Stripe can be run in either testing or live mode - these instructions work for either mode. It's best to start in test mode and run some test transactions to make sure everything is working, you then switch Stripe to live mode and go through this configuration again with your 'live' keys.
There are three main items that you have to get from your Stripe account to configure it in Pakk: Publishable Key, Secret Key and Webhook Signing Secret. You have to fill those in your Stripe config, which can be found in the "Payments" tab of your Pakk account config page (the little cog icon in the Pakk toolbar).
API Keys
From the Developers/API Keys section, grab the following codes and paste them into your Stripe config in Pakk
API Keys > Publishable Key
API Keys > Secret Key
Webhooks
In the Webhooks section, click Add Endpoint to create a new notification endpoint for Stripe payments. In the popup, you need to enter the URL of your webhook, which is any domain pointed at your site plus /webhooks/stripe.
So, if your site was at pakk.io you'd enter https://pakk.io/webhooks/stripe. Check that the version is 2024-06-20, and then select two events to send:
payment_intent.payment_failed
payment_intent.succeeded
Once you've created the endpoint, you can get a Signing secret from the webhook page you just created in Stripe - you need to paste that into your Stripe config in Pakk too. Finally, again inside the Pakk Stripe config, choose your locale and select Enable.
If you don't need to upgrade your whole account to the latest API and just want to upgrade your webhook, this what you do:
Go through the same steps as above and create a new webhook (if it defaults to another version, change it to 2024-06-20)
Delete the old webhook
Copy the Signing secret from the new webhook and paste that into your Stripe config in Pakk. You must remember to do this, otherwise your Pakk config will be pointing to the old webhook you have just deleted!
The engine of the demand planner is the detailed “order screen” where you work up a supplier order from the base predictions made by the system.
Let’s be straight - there are a lot of numbers on this screen. It can look pretty intimidating at first, but it’s worth taking the time to understand what’s going on.
The first set of columns show your current stock situation for each product: how many you already have, how many are committed on orders, how many are already on order etc. Those columns are there for reference. There are some other reference fields like “units per case” and “shelf life” which are there simply to make your life easier.
The next numbers warrant more detailed explanations.
This is the number of units the system believes you are short by in order to get through the cover period. Think of it as the ‘raw’ prediction of the number of units you need to order (or that you are overstocked by, if the number is negative). This number takes into account the amount you already have of the product plus the predicted amount you need to get through the coverage period. At this point, it's not taking into account any that you already have on order.
This is intended to give an indication of whether the sales in the current planning period are likely to be different from the general average/upper bound for the product. This is the case for seasonable products which sell much more during particular seasons, such as Christmas trees.
This is calculated by taking the weighted average of sales for previous years within this window and comparing it to the upper confidence-interval bound for sales during the rest of the year. It is compared against the upper confidence-interval bound, because that is the value used to calculated the recommended amount to-order.
A seasonality of greater than 1, means you can expect to sell more during the current planning period than the rest of the year. A value less than one is normal because it is produced by comparing the average within the window period to that upper confidence-interval bound. Nevertheless a seasonality value of less than around 0.5 is quite striking and means that you can expect to sell less at this time of year than normal. This is unusual, seasonal products usually have a peak, rather than a trough. Click on the ref column to the left to see the graph of weekly sales to better inform your ordering if the seasonality is below 0.5.
A seasonality of 0, means that none of your stock was sold within the planning period. Perhaps have you have a highly seasonal product that's not in season. A seasonality of "Infinity", means that all of your stock was sold within the planning period. That means you have a seasonal product and it is in season now, plan accordingly.
You can choose to factor the seasonality multiplier into the 'to order' calculation by checking the 'inc seasonality' checkbox, either for individual items or for all items on the draft order.
Almost the net calculation now, the ‘to order’ recommendation is simply the shortage minus the number of units you already have on order, if any.
This really is the net calculation. In most cases you have to adjust your order to fit the pack or carton size of the item. If you’ve supplied this number for the SKU, the system will round up your order to ensure you are ordering in full cases.
This is a very useful metric for products that have a limited shelf life, like food. You could even use it for products that become irrelevant after a certain time, like fashion items. For this metric to work, you must have set the “Shelf Life” field on the product. Shelf life is measured in days.
Remember we talked about “variability” above when discussing the calculations used by the demand planner? As part of that calculation, the system calculates a “lower boundary” for weekly sales. Think of this as the worst case scenario. So, for example, we gave the example of 10 units per week average above - but perhaps the worst case scenario over the course of the 4 week cover period is only 2 units per week. That’s a total of only 8 sales in the month versus an expected average of 40. Again, that’s the worst case scenario. If sales carried on like that we’d end up with 20 weeks of stock cover instead of 4 if we ordered the recommended 40 units. That might not be a problem for many items, but what if we were talking about a food product that only lasted 10 weeks? In that scenario there would be a very high “over order risk” ("expiry danger") and we might decide to adjust down our order.
If you want to skip over understanding the maths, just think of it as a measure of how high the risk is of you ending up throwing product away!
This is the interactive part. The “My Order” field is going to default to the recommended “To Order” number (adjusted for pack size) but you can manually override that number as you build up your order. As you change the number to order, you’ll see the price and weight change on-the-fly, so you can get an idea of the overall cost and weight of your purchase order.
If your supplier insists on minimum orders, or if you are trying to fit the whole order on a single pallet, for example, you can keep an eye on these numbers as you build up your order.
If you need more intelligence on any particular SKU, just click it to reveal a detailed graph of sales and a breakdown of metrics. Here’s where you can get a more detailed picture of how sales of this item have evolved and a visual representation of seasonality. Average weekly sales, as well as lower and upper boundaries for sales (again, think worst-case and best-case sales scenarios) are shown on a year by year basis. This information is intended to inform expert decision making when manually tweaking orders.
Another example of something that can be seen here is an item in which sales are trending either up or down. If you can see that the sales of a particular item are generally increasing over time, then you may wish to increase the amount you order appropriately, and similarly for an item that is seeing decreasing demand over time.
When calculating statistics, such as the average weekly sales for each item, we typically exclude weeks with zero sales. The rationale for this is that zero sales within a week likely represents a week in which the item in question was out of stock, rather than not selling. Since we want to know how many to order to prevent an item being out-of-stock, we exclude zero sales weeks within such calculations. This column allows you to take zero sales weeks into account for such calculations. This usually makes sense for big/rare/expensive items which have a low sales rate, like 1-2 units a week, where zero is a likely value even if there is stock of the item. If you allow back-ordering of out-of-stock items then it also makes sense to include zero weeks, since that means lack of stock cannot be the reason for the zero sales.
In summary, include zero weeks if main reason for any weeks of zero sales was lack of demand rather than the product not being available.
Once you’re happy with the tweaked order quantities, the final step is to hit the “Create Purchase Order” button. This will take you to a Purchase Order creation screen in Pakk with the lines pre-filled with the order you created in the demand planner. Now you can finish the order by adding all the meta information like delivery addresses, logistics information and specific instructions. From there, it’s just 2 clicks to send it off to the supplier by email!
The final option for modifying prices in Pakk are manual order lines. These can be either positive (a charge), or negative (a discount).
These are intended to be used on an ad hoc basis and shouldn’t form an integral part of your approach to pricing. They are useful for implementing one-off discounts - for example if you need to offer a discount as a gesture of goodwill to a customer.
In Pakk, line charges and discounts are treated the same as any other product so just set them up as products with a sensible name and SKU that will be easy for you to find and give them a standard “price” (positive or negative). You can always adjust this price on the fly when you add it to an order. It’s important to mark it as a non-stockable item, as of course you won’t be tracking inventory for these adjustments.
‘Tickets’ are the basis of the 'Help Desk' system. All customer enquiries, complaints, questions and issues are logged and tracked on the system in the form of Tickets.
Tickets contain the following information:
Name and contact details for the customer, and a link to their record in the system
Details of the website and/or form from which the ticket originates
Links to any related records in the system, like orders, estimates and credits
Tags for organisation
Stages to create customer workflows for dealing with Tickets
An assignee, so you know who is responsible for dealing with the Ticket
A complete record of the conversation between the customer and your company. The conversation consists of ‘interactions’ between the customer and your representatives. Each interaction records the timestamp, text, the person who interacted and optional attachments
A status, which can be Pending Action, Awaiting Reply or Closed
A summary of the ticket which is displayed on list views
To get started, you’ll need to create a Loyalty Program. You’ll find Loyalty Programs in the Setup group in the main menu. Create a new Loyalty Program with the following details.
Name: The public name of the loyalty scheme. This name will be visible in multiple places on the website and in emails, representing the loyalty program to customers.
Introduction: Custom text displayed at the top of the autogenerated loyalty program information page. This introduction sets the tone and provides essential information about the loyalty program.
Points Per Unit of Currency: Defines how many points customers earn per unit of currency spent. Fractions of points are not awarded, with any spending not reaching a full point rounded down. For example, if you set this value to 1, the customer will be rewarded with 1 point per £/$/€ spent.
Disable Accumulation: Allows halting the accrual of loyalty points while still permitting point redemption. This option is useful for suspending or ending a loyalty program but allowing a grace period for redemption.
Points Expiry Days: Sets the lifespan of loyalty points from the award date, we recommend a 1-year expiry.
Point Value: Establishes the monetary value of a single loyalty point for redemption purposes, guiding how points convert to monetary discounts when orders are placed. For example, if you set this value to 0.01, the customer will get a 1 cent/penny discount for every point redeemed.
Categories and Products Blacklist: Specifies whether listed categories or products are excluded from redeeming points, with the rest being included, or vice versa (works identically to restrictions on Discounts, please see documentation for that feature for full details).
Products and Categories: Defines specific products and categories to include or exclude from point redemption, affecting eligibility based on the blacklist or whitelist approach (works identically to restrictions on Discounts, please see documentation for that feature for full details).
Require All Products: Conditions point redemption on the presence of all specified products in the shopping cart, adding an all-or-nothing requirement for eligibility.
Minimum Order Value: Determines the lowest order value eligible for point redemption, with options to consider VAT inclusive or exclusive subtotals.
Currency Symbol: To track loyalty points as a unique “currency” or in the Journal system. Points are recorded in their original denomination and are not converted to monetary values. Assign a 4-letter symbol to represent points in Journal Entries. This symbol acts as a currency for points and must be unique to avoid confusion with real currencies. Multiple loyalty schemes can run simultaneously, each potentially having a different point value. For technical reasons, you cannot change the Currency Symbol once the Loyalty Program has been saved for the first time.
Account for Loyalty Discounts Given (Expense): Tracks discounts customers receive upon redeeming loyalty points. This account is essential for monitoring the expense incurred through loyalty point redemption.
Account for Loyalty Points Distributed (Expense): Functions as a counterpart to the "Loyalty Points Outstanding" account. Points distributed are logged as an expense to balance the liability recorded. When points are redeemed, this expense transfers to the "Loyalty Discounts Given" account in real currency, reducing the liability account correspondingly.
Account for Loyalty Points Outstanding (Liability): Keeps track of loyalty points awarded to customers that remain unspent. This account is crucial for managing the liability of issued but unredeemed points.
Reconciliations are entities in Pakk, so you have the usual facilities of creating a new one, viewing a list of existing ones and editing currently open ones.
When you create a new Reconciliation, you'll need to provide the following details to set it up:
Account: the Account you want to reconcile.
Currency: Accounts in Pakk are multi-currency, but you can only reconcile one currency at a time.
Statement start date: the date from which to start this reconciliation (only transactions after this date will be shown). If you're reconciling with a paper statement, this will probably be shown on the statement.
Statement end date: the date at which to end this reconciliation (only transactions before this date will be shown). If you're reconciling with a paper statement, this will probably be shown on the statement.
Starting balance: the actual balance of this account at the start date. This should correspond to the last reconciled balance for this account.
Ending balance: the actual balance of this account at the statement end date.
Once you've provided the above information, hit 'Save' and the reconciliation will be created.
You'll immediately notice that the system then shows available transactions for reconciliation.
Note: You can't change the Account or Currency on a Reconciliation once it has been created.
Sales orders show pertinent information regarding credit:
Invoiced: whether the order has been invoiced
Invoice Ref: the unique numerical invoice reference for the order
Invoiced At: the official invoice date for accounting and tax purposes
Terms: the number of days terms applied to this invoice
EOM Terms: whether the invoice is due at the end of the month (see above)
Paid: whether the invoice is fully or partially paid
Outstanding Balance: the amount remaining to be paid on the invoice
Due By: the date the invoice falls due
Days Overdue: number of days the invoice is overdue (0 means not overdue)
These fields are available on multiple Sales Order list views that can be helpful for credit chasing, particularly ‘Pending Invoice’ and ‘Pending Payment’.
Customer records also show a lot of information that is useful for credit chasing:
Earliest Due Invoice: the due date of the earliest invoice that falls due. This could be in the past (overdue) or future.
Overdue Days: if the customer has any overdue invoices, this is the number of days overdue on the most overdue invoice.
Balance: total amount due, broken down by individual currency.
Balance (Account Currency): the total amount due, translated into your account’s home currency using the latest available exchange rates (Accounting > Exchange Rates)
% Credit Used: the proportion of the customer’s credit limit that is represented by their current outstanding balance.
The Customer list view ‘Credit Management’ brings together all these fields in one view and filters to show only customers with an outstanding balance. This list would probably be your first port of call when doing credit management operations.
There are also numerous Reports that can show open invoices and customer balances viewed in different ways.
Customer statements can be used to keep customers up to date regarding the state of their credit account. Statements can be printed or emailed individually, or in bulk.
If you allow your customers to buy without immediate payment, you will be using Pakk’s ‘customer credit management’ features to track outstanding invoices and balances.
This document provides an overview of all the different but related functionalities designed to help you with credit management.
There is nothing to stop you doing this in principle but there is no "admin card payment" portal built into the Pakk admin dashboard. If you need to process a card payment manually you will need access to a MOTO gateway provided by your card processor - you would then enter the payment manually on the order in Pakk.
Stripe does have a manual payment creation option, although they discourage overuse of it (for very good reason).
In general, we have architected Pakk to help you get away from taking manual card payments. It's risky business, highly complicates PCI compliance and in general is best avoided. There are many ways in which Pakk can help you move away from telephone/manual payments:
Firstly, the Pakk buying experience and flow is fast and efficient: customers who might normally complain about purchasing online and prefer telephone will come to love using your store.
Customer carts and wish lists are synced constantly so you can actually help them with their purchase by adding/editing the cart in real time, while they are on the phone, but still have them complete the order themselves
Even in the case that a customer insists on placing an order over the phone, you can still have them go into their account and pay for the order after the fact. Remember there is no messing about with "account set up" nor any password for them to set and remember (or more likely forget) and paying for an order after it has been placed takes 3 clicks and works on phones.
We're building Pakk as the commerce platform for the next 10 years, not the last 10 years. Try to get away from taking payments over the phone if you can!
A full guide to understanding and setting up Shipping Methods for your Pakk business and sites
Shipping method configuration can look intimidating at first glance - there are almost limitless combinations of configuration options. For Pakk, we chose to make our shipping methods super powerful which meant sacrificing a certain amount of 'simplicity'. But don't worry, in this guide we'll outline all the possibilities and how they fit together.
Give your new Shipping Method a sensible name and description which will be visible to your customers on your websites - so make them meaningful.
Setting a priority will determine how high up this method shows in a list of available methods.
Set an estimated days transit to help the system display useful messages to your customers regarding when they can expect to receive their order.
Set a preferred carrier to choose the default carrier which will be chosen for this shipping method when dispatching an order.
Full Credit from Sales Order
This is the easiest and quickest way. From an Order, just click the ‘Full Credit’ button. You’ll be asked for the date of the credit, which allocation account to use, and whether to send a confirmation email to the customer. These options will be explained a bit later.
A credit will be created to exactly mirror the Order - all the order lines will be transferred over, as well as shipping costs and web discounts etc. The total of the credit will be exactly the same as the sum of the original Order.
If you are indeed crediting the entire order (for example, for a package lost in transit), you won’t need to make any changes to the credit. If you are crediting MOST of the order, this is probably the best starting point - just delete the lines you don’t want to credit.
Note that this is THE ONLY way to credit shipping from an original Order. The other credit creation techniques won’t allow you to do that.
Also note that just creating a Credit from an Order doesn't actually APPLY it to that order (see 'Applications' below).
Manual Credit from a Sales Order
On the ‘Credits’ tab on every order you’ll find a ‘Manual Credit’ button. This is a quick way to kick off a Credit tied to a particular Order (and thus a particular customer), but without any of the order lines being transferred over. If you’re only crediting one or two lines in isolation, this is probably quicker than doing a ‘Full Credit’.
Create New Credit
You can always create a new Credit just like you can create any other record in the system. You might choose to do this if the Credit isn’t tied to any particular order. For example, a customer is claiming that a product he bought 6 months ago is faulty.
Remember to choose the correct Customer when creating Credits manually because you can't change the Customer on a Credit once it has been created.
For a more detailed rundown of maths that power the demand planner, check out our blog post Some Simple Math To Improve Your Stock Ordering.
You’ll notice I haven’t actually explained how the demand planner “works” from a mathematical perspective. Well, that’s partially because it’s only semi-relevant to you, as a user. Of course, understanding the mechanics of the calculations will help you get your head around the predictions it makes and potentially understand any odd recommendations, but you don’t need all your team to fully understand the algorithms at work.
The core calculation the demand planner makes is based on the “weekly average sales” of each item. If you want to stop there, that’s a good place to leave your understanding. So, if you sell, on average, 10 units a week of SKU_A and have “stock cover” set to the default 4 (one month), the demand planner will aim for a stock level of at least 40 after placing the order. That's a big simplification - the demand planner will actually tend to encourage you to order more in order to be more confident of being able to fulfil orders if demand is higher than normal. More on that in a minute.
I say “aim for a stock level of 40” rather than “order 40” because the demand planner, as explained previously, takes into account how much of the product you already have on hand, how much is already on order from the supplier and how much is on back order from customers. Hence it might be the case that you already have 50 available, in which case you’d have more than enough and no order would be necessary. That’s one of the nice aspects of having all your stock data in one place!
Of course, there’s more to the calculation than “average weekly sales”, but that’s a good starting point for understanding the algorithm. We also take into account an element of “variability” to adjust the order recommendation: for example, the average sales per week might be 10, but what if this is made up of some weeks where 100 are sold and some weeks where none are sold - this will significantly impact the stock you need to have on hand in order to be confident of fulfilling orders.
Confidence is actually the key word here. The demand planner uses a statistical concept called “Confidence Intervals” in order to calculate a stock recommendation for which is can be “pretty confident” you’ll have enough stock to get through the stock cover period you’ve set. Of course, it can never be 100% confident - for that you’d have to order 20 times more stock than you really need, so it would be a useless approach. But “pretty confident” is normally a good balance between not overstocking too much and being able to fulfil your orders.
The exact level of confidence used by the demand planner is influenced by the 'strategy you choose' (see above). For example, if you choose 'Avoid Stockouts Aggressively', the system will use a 95% confidence interval, which means a statistical chance of running out of stock of 2.5%. Unfortunately, the more aggressive the strategy you use (in terms of avoiding stockouts), the more stock you'll need to order. Therefore, if capital outlay is more important to you than keeping everything in stock, choose a less aggressive strategy like 'Balanced overstock' or 'Minimise Outlay' (which will actually deliberately underorder).
At the end of the day though, it’s just a guess, so you should add in some human expertise. Just understand that the demand planner will encourage you to order more than you need to cover average sales, because it tries to help you maintain 100% stock coverage and avoid stock outages.
If you want to be more conservative in your ordering and are less concerned about stock outages, you should adjust your ordering downwards.
Sometimes, things go wrong. It’s an inevitable part of doing physical product commerce.
Sometimes, things go wrong. It’s an inevitable part of doing physical product commerce. I bet you’ve seen all of the following scenarios:
Customer makes a mistake on order, calls before dispatch to change
Customer makes a mistake on order, only realises once order received, wants to return
Order gets completely lost in transit
Some items in order get totally written off in transit
Some items get slightly damaged in transit
Order is delayed, customer is angry
Customer claims when placing an order that an item was missing on the order they received one month ago
Reflecting how these scenarios play out on the system is a key part of maintaining accurate financial, stock and customer records and balances, but it can be fiendishly difficult at times, given the complexity of the scenarios.
In this guide, we walk you through the process step by step, but let’s start with a few ground rules.
Whatever happened, try to reflect that as closely as possible on the system. If an item was dispatched, don’t remove it from a dispatch on an order. If a customer payment was made, don’t delete or change it to try and make the numbers balance.
You can’t change history, either in real life or in Pakk.
Except in certain, very limited circumstances, situations of this kind are dealt with by raising a Customer Credit. That should be your first port of call. A customer credit gets the ball rolling whether you’re aiming for a refund, replacement or just a pending credit balance.
OK, before we talk about Credits, let’s briefly discuss what you can do without a Credit.
Last minute changes to orders are common. If you change a pending customer order early on in the sales cycle, and the resulting amount is less than what they paid (you removed a line, or reduced a quantity, for example), you can do a ‘quick refund’ by entering a negative payment in the payments list (at the same time as manually refunding the money, through Stripe or Paypal, for example).
Making changes to orders that have been invoiced isn’t allowed in some jurisdictions so you should check with your account administrator whether they would like you to use this technique or not.
If the order has been dispatched, you definitely shouldn’t use this technique as you shouldn’t be changing order lines once the order has left.
Another common technique that doesn’t require a credit to be raised is adding items to an order, then removing the financial impact of that addition by entering a discount line.
For example, a customer placing an order claims that on a previous order a product was damaged and that you ‘owe them a replacement’. Obviously this isn’t ideal - they should have reported the incident when it happened and it should have been logged and processed, but reality is messy and this kind of thing does come up and sometimes you want to give the customer the benefit of the doubt.
You add a replacement into the order, but this would increase the order total and thus make the order show as ‘Pending Payment’. You can negate the extra cost by entering a discount line of the same amount as the replacement.
Make sure your account administrator sets up specific discounts tied to specified cost tracking accounts, like ‘Discount for Replacement for Damaged Goods’, so that you can accurately track the costs associated, and use the correct discount for each situation.
Customer Balance
An OUTSTANDING (i.e. not used) Credit impacts the Customer’s account balance. It means you now owe them money.
Stock Levels
A Credit on its own does not impact stock levels. If you want to bring items back into stock, you need to create a Return separately.
Cost Allocation
Crediting a customer is accounted for as if the income has been lost. Therefore, in the system-generated journal entry created by the created, an entry will be made against the default account that has been set for customer credits. This should be an income account that is netted against top line revenue in income statements.
If you're trying to learn more about the Pakk accounting system - this is a great reference to understand the basics of how Pakk achieves 'parallel' accounting for transactions.
What follows is a step-by-step breakdown of a Pakk automated Journal Entry relating to a Sales Order. If you're trying to learn more about the Pakk accounting system - this is a great reference to understand the basics of how Pakk achieves 'parallel' accounting for transactions.
The Sales Order in question is Order 1805, placed on the 9/9/24. The order is a simple, single line order for a two units of a product costing £15 + 20% VAT = £30 + VAT = £36 total. The order is invoiced, stock is committed and dispatched, and payment received.
In the Primary Info pane of the Journal Entry, note the following fields:
Date: in the case of a Sales Order, this is the order date
From Transaction: a link back to the underlying transaction
From Transaction Type: the type of the underlying transaction
Now we'll go through the lines individually. Instead of going from top to bottom, we'll analyse the Journal Entry in a more logical fashion. Before we start, however, note the following: lines that have a line date impact on that date, lines that have no date impact on the date of the journal entry. Put another way, a line date overrides the top-level date in terms of when the account impact happens.
The top three lines represent the logical starting point and balance each other out. Since the order was invoiced on the 10/9/24, this is the tax point for the order and therefore these lines override the top-level Journal Entry date.
The full £36 of the order is split between £30 on the income account, and £6 on the VAT liability account
On the other side of this equation, £36 is ascribed to the accounts receivable as this is now owed by the customer
The value of the stock at the point of commitment was £19. This amount is captured in a balancing pair of lines, also entered at the invoice date of the order.
£19 is ascribed to the liability account 'Stock Sold Not Dispatched'
On the other side of the equation, £19 is ascribed to the COGS account
Good dispatched happened on the 12/9/24 and leads to the creation of another pair of balancing lines.
The stock asset account drops by £19 as a reflection of the new, lower stock holding
The £19 that was originally ascribed to the 'Stock Sold Not Dispatched' account when the stock was committed is now 'cancelled out'
Payment was received on the 17/9/24 (marked as 'Today' in the screenshot). This leads to another pair of balancing entries.
The 'Bank of Scotland' account goes up by £36
On the other side of the equation, the accounts receivable now drops by £36
In this simple example, loyalty points were clearly awarded at a rate of 1 point per £1 spent, such that 36 points were awarded. Notice the pair of balancing lines where the currency is 'PFPS' rather than GBP (loyalty points are fully tracked in the Pakk accounting system and are treated as a 'currency').
The increased loyalty point liability is ascribed to an internal account
On the other side of the equation, an expense for the same amount is entered
Part 2 of our "Admin Panel Tutorial Series" covering the basics of how to use the admin panel as well as some more advanced topics and workflow tips and tricks.
In this video we cover:
Main menu, entities
Main list views for entities
Alternative list views
3-dot view (root view)
Finding inactive records
List pagination controls, create new record from list and menu
Quick search
The left-hand portion of the admin panel's main menu is key to managing the system's entities, which represent the various items or records tracked. The menu is organized into eight groups, each containing different entities like suppliers, purchase orders, and items.
When selecting an entity, clicking on its bold and underlined name directs you to its main list view. This list view displays all records for the selected entity, such as suppliers, customers, or items. For example, clicking on "Suppliers" shows the full list of suppliers.
Each entity can have multiple alternative list views tailored for different use cases. These views display specific sets of fields based on what you're working on. For example, the "Items" entity has alternative list views like:
Stock Availability: Focuses on stock data such as on-hand, on-order, and back-order amounts.
Sales View: Shows sales-specific fields, including price and item name.
Web Store Fields: Displays fields related to online store data.
These views are particularly helpful for entities with transactions, allowing users to quickly access filtered views depending on the current task (e.g., pending orders or invoices).
The three-dot view, also known as the root view, displays all fields for an entity, making it a comprehensive but sometimes overwhelming view. This view is rarely used except for specific tasks, such as viewing inactive records. Inactive records are not deleted but "hidden" and can be reactivated through the three-dot view.
For instance, if an item is inactivated, it will no longer appear in regular list views. However, by using the three-dot view, you can find and reactivate that item.
Each list view contains pagination controls, allowing you to navigate through records, with 50 records displayed per page. You can skip between pages, jump to the start or end, and view the total number of records.
To create a new record, you can either use the create new button from within the list view or the plus sign next to the entity in the main menu. This brings up a form to enter the new record details.
Most list views have a quick search feature, which allows you to quickly narrow down results based on specific fields like SKU, name, or customer ID. You begin typing a keyword, and the system will automatically search after three characters. The quick search is context-specific; for example, in the "Items" view, it will search by SKU, whereas in the "Customers" view, it searches by name.
Entity Organization: Menu groups organize entities like suppliers, purchase orders, and items.
List Views: Clicking on an entity name brings up a main list view of its records.
Alternative List Views: Entities can have specialized views for different tasks, such as stock availability or sales information.
Three-Dot View: A comprehensive view that shows all fields, including inactive records.
Pagination: Easy navigation through large sets of data.
Quick Search: Efficiently narrows down results based on the current context (e.g., SKU, customer name).
The admin panel is organized into entities representing different data sets.
List views allow easy access and management of records for each entity.
Alternative list views provide tailored displays for specific tasks.
The three-dot view is essential for accessing inactive records or seeing all fields at once.
Quick search and pagination make data navigation efficient and user-friendly.
Managing your tickets is fairly self-explanatory, but here are some pointers.
Tickets can have one of three statuses: Pending Action, Awaiting Reply or Closed.
Use these statuses for top-level organisation of Tickets.
New tickets will always start ‘Pending Action’
When working on Tickets, admin users need to manually mark when a Ticket is ‘Awaiting Reply’ (from the customer). This is a single-click operation from the Ticket detail page.
Likewise, if an admin user wants to change a Ticket from ‘Pending Action’ to ‘Awaiting Reply’, this can be done with a single click.
When an admin user replies to a ticket an email WILL be sent out to the customer to notify them that the conversation has been updated.
When an admin user makes a note on a ticket, an email WILL NOT be sent and the customer never sees notes.
When a customer replies to a ticket email, the Ticket is updated and the status is automatically set to ‘Pending Action’ (even if it was previously closed)
If you need to organise Tickets internally along custom divisions, use either ‘Stages’ or ‘Tags’, both of which should be set up by account owners.
Attachments can be added to both replies and notes.
Attachments added to replies WILL be sent to the customer.
Attachments added to notes WILL NOT be sent to the customer - they are just for record keeping (for example, if the customer sends you an image by WhatsApp and you wan’t to add it into the Ticket).
We recommend you make use of the ‘Related To’ field to add in any customer Orders, Estimates, Credits etc that are related to the Ticket. That way you have a link to those records immediately at hand when dealing with the Ticket.
You can draft out a response to a customer without sending it by editing the 'draft response' field. When ready to send the reply, just move it to the 'response' field by clicking on the right-pointing arrow.
Create a summary of the ticket in the 'summary' field. This will be displayed on all list views - giving a quick overview of what each ticket is about.
Sales, sometimes referred to as 'in-person' sales, are useful for hybrid offline-online business such as retail stores and wholesale trade counters.
In Pakk there are two ways to register an outgoing sales transaction:
Orders: for multi-stage sales transactions where commitment, billing, dispatch and payment can all happen at different, interleaving stages. They support complex workflows and used automatically for all orders coming from your Pakk websites.
Sales: for immediate, in-person sales where the customer pays and takes away the items on the spot. They do not support complex workflows and are therefore much less powerful than Orders, but much faster to enter and process.
You should use Orders for online, telefone and email orders. You should use Sales for in-person, in-store sales.
Some notes and guidance on using Sales on a day-to-day basis
Unlike Orders, Sales can be made anonymously (i.e., the customerfield is optional). Because Sales never have an impact on customer credit balances (because they are always paid), selecting a customeris more for administration/reference.
We strongly recommend you select the customer if you can. This will link the Sale to the customer record allowing cross-referencing in the admin panel, better reporting and for the customer to see their Sales in their account center when logged into your website.
You must choose a payment method for the Sale. This is so the system knows which internal account to route the collected payment to. You can set up specific in-person payment methods for sales if necessary.
You can set up a default payment method for Sales in your account settings.
If you use locations, you can choose which location this Sale is being made at. If you don't choose a location, then stock from all locations will be available for Sale and you can select lines with batches at multiple different locations.
If you do select a location then the system will only show batches with stock available at the chosen location.
Note that you MUST select a batch on each line on a Sale. This differs from the behaviour on Orders where the batch field can be left unselected to signify uncommitted stock. Since Sales don't support uncommitted stock, batches must be chosen.
For composites, where transformation of the composite occurs after saving the Sale, you need to edit the Sale and select batches on each line. If you do not, the stock of those items will not be impacted correctly and it will be as though you did not complete sale of those items. Note that an error message will show if this is the case.
You can set up a default location for Sales in your account settings.
Sales, like Orders, can be 'linked' to one of your websites. There are a few reasons for this:
so the system knows which branding to apply to emails and PDFs
so any web discounts can also be applied to the Sale
so loyalty points can be accumulated/spent
so the system knows to show this Sale on the customer's logged-in account center on the website
You can set up a default website for Sales in your account settings. If you do not 'link' a Sale to a website then a lot of the above will not apply: i.e., web discounts won't be applied, loyalty points will not accumulate, only account or brand-level branding will be applied to PDFs and emails, and the customer will not be able to view the Sale in their account centre.
Sales share templates with Orders. These templates are configured and customised as part of the Website setup. There are only two available templates for Sales and both apply to PDFs and emails:
Receipt: always available
Paid Invoice: only available where a Sale has been invoiced
You can find the customizable templates under `Setup > Websites > {Website Name} > Transactional Emails' and `Setup > Websites > {Website Name} > PDFs'
It’s easy to make mistakes when creating and applying Credits. You can check the logic of what you’ve done by looking at the following
The customer’s balance: is it what you expect after the transactions
The state of the original Order: is it showing as fully paid, if that’s what you expect
The state of the Credit: is it ‘fully used’ if that’s what you expect.
Exchange rates can either be set to automatically update on a daily basis (find this in Account Settings) or can be entered manually on an ad-hoc basis. If you set rates to automatically update daily, you can still go in after the fact and tweak the entered rates for any day.
Our exchange rate provider is abstractapi.com who in turn work with multiple industry providers to supply accurate, up-to-date rates.
By default, the demand planner uses as much historical sales data as it can to work out future predictions (with a limit of 3 years). Sometimes you may wish to shorten this window of historical data used so that only the most recent data is taken into account. For example, if more recent data is much more indicative of future performance because you have only just started selling a product, or a product has changed fundamentally, or trends and tastes have changed. You can set a default 'Historical Data Window (Weeks)' at account level, but can also increase/decrease on the fly while using the demand planner.
The key concept to understand when approaching the demand planner is stock cover: the number of weeks of stock you would ideally like to be covered for for each item.
Don’t make the mistake of thinking that this number represents the number of weeks of stock to order. The demand planner takes into account the stock you already have on hand, as well as what you might already have on order, so if you already have enough stock to get through the “stock cover” period, the demand planner won’t recommend you order that particular item.
Your default number of weeks stock cover can be set at Account level, but you should think of the “stock cover” setting a knob to be twisted and tweaked as you do your demand planning. Don’t be afraid to increase and decrease it on the fly to shape the predictions created by the demand planner.
The demand planner uses a mathematical strategy (more details on that later) to calculate restocking levels. Different strategies try to balance the competing demands of ordering enough stock and minimising capital outlay in different ways. You can set your default strategy at Account level, but again, you should consider this another variable to be tweaked as you do your restocking. The strategies available are:
Avoid stockouts aggressively (95% CI, upper bound): The most aggressive strategy in terms of avoiding stockouts. Will tend towards significant overrordering. Recommended for most businesses that want to avoid stockouts and who are not too sensitive to capital outlay on stock.
Avoid stockouts (75% CI, upper bound): Tends towards a certain amount of overordering in order to avoid stockouts to a realistic level. Also a good balance for most businesses.
Balanced overstock (50% CI, upper bound): A slightly less aggressive approach to avoiding stockouts but still erring on the side of caution so will still lead to some overordering. Also a good setting for most businesses.
Average: Uses the weekly average as the ordering target. The most neutral strategy. Statistically leads to a stockout during the planning period 50% of the time.
Balanced under stock (50% CI, lower bound): Slightly more conservative than the average. High chance of stockout during the planning period. Only use this if stockouts are acceptable to your business or perhaps if your procurement time is short.
Minimise outlay (75% CI, lower bound): Minimise capital outlay at the expense of high chance of stockout. Not recommended for most businesses.
One of the most prominent and loved features of the demand planner is the “traffic light” system - this is a sidebar consisting of a list of your suppliers, each with a little status indication dot that can be green, yellow, amber or red, corresponding to the urgency with which an order needs to be placed with that supplier. These traffic lights give you an at-a-glance overview of your stock status on a supplier-by-supplier basis.
Of course, the stock status depends very much on the “stock cover” period you choose, so if you tweak that number, the traffic lights will change in tandem.
The demand planner is a hard worker. As you tweak your “stock cover” period it recalculates draft orders for all your suppliers on the fly. On the home screen of the demand planner, you’ll see simple summaries of the draft orders that have been created for you.
Again, notice how, as you increase your “stock cover” period, the draft orders get bigger, reflecting the fact that the demand planner is recommending you to buy more units.
Draft orders are just that, a starting point from which you can create finalised purchase orders. To start working on an order, either click the supplier name in the traffic-light sidebar, or click on the “edit” icon on the draft order.
Pakk helps you go from historical sales data, through demand model to final purchase order sent to supplier, all in a matter of minutes. Here’s how.
In a busy physical-product business, working out how much to buy of each product is a key element to business success. Business owners need to balance a whole host of complex requirements when restocking, for example:
Try not to be out of stock of any products at any point in time
Don’t tie up too much working capital in stock that sits in storage for long periods
Take into account supplier and delivery lead times
Don’t overstock limited-shelf-life products, leading to disposal of expired stock
Take into account seasonality patterns and time of year
Take into account any unusual, one-off events like promotions (e.g. Black Friday)
Take into account supplier ordering requirements like pack sizes, minimum orders, minimum weights
Take into account transport requirements, like maximising van space, pallet space or pallet grouping
Given all the above considerations and the specificity of requirements of each business, working out how much stock to order, or “demand planning” is a real challenge, and is part science and part art. In our experience, for a small business with complex requirements in stock ordering, this task tends to get “siloed” - only one or two people, usually the owner, know how to skillfully order stock.
Demand planning means using historical data to predict future sales so that you can replenish your stock in an efficient way. In our experience, very few smaller businesses practice formal demand planning - instead preferring to rely on much simpler stock replenishment techniques like:
Guesswork: where someone familiar with the business just guesstimates how much to order
Same order each time: just order the same amount of stock each week/month
Last minute panic: discover they’re out of stock and phone in an emergency order
This is probably the case because the types of sophisticated software that enterprises use to create statistical demand models and plan their reordering are far out of reach of most small businesses, plus their complexity can be overwhelming and integration with e-commerce/ERP systems a headache.
Pakk seeks to remedy all that with an intelligent, built-in demand planning tool that is minimal, useful, integrated and easy-to-use. Here’s a rundown of how it works.
Customizing and Saving List Views Pakk has lots of carefully thought out List Views designed for specific workflows. But sometimes the fields that you want aren't there, or there are too many. Customizing your list views lets you see just the fields you care about and ignore the rest.
Accessing Customization: Click the columns icon in the list view toolbar. 2 . Customizing Columns: Check or uncheck the available fields list to add/remove them from the visible columns area and click Done.
Saving Custom Views: If you are an account owner, you can save that list to use later. Give it a name and access it anytime from the list views dropdown.
Custom attributes can have different types of values, such as text, number, choice, or true/false. To ensure you can work and edit with custom attributes effectively in List View, you should visualize all columns associated with them:
Access the Customization Popup: Click the columns icon in the list view toolbar.
Add all Custom Attribute fields: Check the checkboxes for all custom attribute fields.
That's it! You can now view and edit custom attributes for multiple records all in one screen.
Terminology Tip: Cash Sale and Invoice are highly related in the Sales Order workflow. We use the generic term billing status when we need to talk about the order's status with respect to whether it is either invoicedor cash saled.
This part of the flow can be a bit tricky to get your head around, particularly because every country and business does things slightly differently.
You should start by understanding what an 'Order' really is. In traditional retail (bricks and mortar, physical store), there isn't really the concept of an 'Order' per se. You go into a store, pick out what you want, take it to the cash desk, pay, and take the goods away with you with a receipt for your payment. This process is different for online sellers. A cutomer places an 'Order' on your site. This 'Order' might be paid for immediately, or if the customer has payment terms, it might be slated for payment in 60 days. It might be for collection of the goods the very same day, or it might be for delivery in a month.
So an 'Order', in itself, is just an intent to buy. You might think of it as a shell, or container, for everytihng that comes next (billing, stock commitment, payment, dispatch).
Billing = Cash Sale or Invoice or Both
By 'billing' an order (either Cash Sale or Invoice), you create the obligation to pay, even if that obligation is simultaneous with the actual payment. For normal web orders, this obligation is created simultaneously with the order itself, and probably at the same time as the payment. That's why it can be hard to understand, because for most web orders, order creation, billing and payment all happen at once. Just know that they are, or at least can be, logically spearated out in Pakk.
Here are some notes about how the billing logic works in Pakk:
for web orders where the customer has explicitly requested an invoice (even if they are paying there and then), the order is invoiced and an invoice is created
for all web orders with an 'invoice flow' payment method (i.e. any payment method which is not 'immediate payment'), the order is always invoiced and an invoice is created
for web orders where the customer has not requested an invoice and is paying now (e.g by card), the order is cash saled and a cash sale is created
the PDF document that goes with an invoice is an invoice or paid invoice
the PDF document that goes with a cash sale is a receipt
for manually placed orders, you can choose whether to cash sale or invoice
cash sales and invoices each have their own sequential numbering scheme. This is important as most authorities will want to see unbroken numbering sequences for invoices and receipts/cash sales.
cash sales can be invoiced. This is useful if a customer orders as an individual but later requests an invoice. In this case, the order would be both cash saled and invoiced and would have both a 'cash sale reference' and an 'invoice reference'
on the othe hand, an order which is invoiced cannot also then be cash saled
in almost all cases, a cash sale will be paid for in the moment. Pakk does technically allow for unpaid cash sales but it's really only to allow for splitting of the order payment into multiple separate payments, potentially with different payment methods. Generally, an unpaid Cash Sale is in an erroneous state.
when manually billing an order as a cash sale, a payment for the full amount is automatically created at the same time using the payment method selected on the order. You can edit this post hoc if you need to create split payments.
Thankfully, billing is a bit simpler than committment with regards to status. This is due to the fact that an order is either fully invoiced or not invoiced or fully cash saled or not cash saled, i.e. in contrast to the other status axes, we don't allow forpartially on billing status.
If for some reason, you need to partially invoice an order, the best way to acheive something analogous is to split the order up.
Remember Although it feels counterintuitive, orders can be paid before being invoiced (resulting in a situation where you technically owe the customer money, rather than vice versa). We only point this out to underline the fact that invoice status and paid status are independent of each other.
Quick / Bulk Invoicing
To invoice a single order, just set its invoiced at field to the invoice date. To perform the same operation on many orders at once, use the Invoice bulk action from the Pending Invoice list view.
A Credit is ‘Outstanding’ or ‘Pending’ until it is ‘used’. There are two ways to ‘use’ a Credit:
Refund
Apply to a Sales Order
It is important to note that neither of these two things happen automatically. A Credit will sit ‘unused’ until you use it.
Once the whole amount of the Credit is refunded, applied or a combination of both, the Credit is considered fully used.
Refunds
The simplest path to take after a Credit has been raised is to refund the customer’s money. You’ll need to do the actual refund manually (e.g. in Stripe or Paypal). Once you’ve done the refund, record it on the Credit by hitting the ‘Refund’ button.
Note that you don’t have to refund the whole amount of the Credit. You can do a partial refund, which leaves an amount of the Credit outstanding. You could then go on to use that outstanding amount against an Order, or issue yet another refund. A common use for this technique would be if a customer has a large Credit and wants to use part of it as payment against an Order and have the rest refunded.
Applications
Another common use for a Credit is to use it to ‘pay’ for an Order. You can do this by hitting the ‘Apply’ button on the Credit and choosing the Order to which you want to apply the Credit as payment. Again, you don’t have to use the whole Credit - it’s OK to leave some of the Credit outstanding and then use that later, either as another application or refund it.
Applying a Credit has two impacts. Firstly, it will ‘use’ some or all of the Credit. Secondly, it will affect the payment status of the Order. If your Credit use covers the entire invoiced order amount, the order would go from ‘Pending Payment’ to ‘Paid’. Note that you don’t have to cover the whole Order amount. If the Credit application leaves some of the Order amount pending payment, you can either apply another Credit or just take payment from the customer.
Note that at least for now, it’s not possible for customers to apply Credits themselves when placing an order online, this currently needs to be done by an admin user.
Purchase Orders, the orders you place with your suppliers in order to replenish stock, are the reverse side of the coin to Sales Orders.
The workflows for Purchase Orders are quite similar to those for Sales Orders as many of the concepts are shared, so be sure to study the "Sales Order Workflow Mega Tutorial" beforereading this one - in particular, you should understand Item Types well. Since a lot of shared ground is covered in that tutorial, this one is a little less "mega", so you should breeze through it!
Just as is the case for Sales Orders, the receipts, invoice and payments are all created and live inside the main Purchase Order record rather than being separate entities unto themselves.
Purchase Orders have their own status axes:
received
invoiced
paid
Just like Sales Orders, these axes can vary independently and can be in one of three states: not at all, partially (except in the case of 'invoiced') or fully.
In this guide, we’ll take a deep dive into how Loyalty Programs work and how you can set them up.
Loyalty Programs in Pakk are easy to understand: customers accumulate points by spending money on your sites and can redeem those points for cash discounts on future orders.
In this guide, we’ll take a deep dive into how Loyalty Programs work and how you can set them up.
Customers earn points every time they spend money on your sites (or on manually entered orders that are linked to a website).
Customers can redeem points for a discount on an order subtotal (i.e., not including shipping).
Loyalty points are subject to expiry - the expiry period is customizable.
Expiry date applies to a Customer’s entire points balance, meaning that when placing a new order and earning new points with a new expiry date, the expiry on the Customer’s entire points balance will be renewed.
Points accumulated on an order cannot be used for a discount on THAT order.
Points are only awarded on fully paid orders.
Points are accumulated against Loyalty Programs (not against websites), meaning that the same loyalty points can be used across stores (if desired)
The credit terms that are applied by default when a customer places an order with an invoice flow (both via a webstore or the admin panel) can be configured on a customer-by-customer basis with the following fields:
Terms: number of days credit to apply by default
EOM Terms: EOM (End of Month) means that instead of an invoice falling due the exact number of days after the invoice date as specified by the terms, it will fall due at the end that month. For example, if you apply 60 days terms and EOM and the invoice date is 15/6/22, instead of the invoice being due on 15/8/22, it will be due on 31/8/22.
These are the terms applied by default on new orders, but admins can vary them on an ad-hoc, order-by-order basis if necessary.
To process an over-the-counter cash sale in Pakk, begin by creating a new Sales Order. You can choose an existing customer, create a new one, or use a generic profile like "Over-the-Counter." The generic option is convenient as it bypasses the need for entering shipping and billing information, though it won't allow you to send invoices or receipts.
Add the items and adjust quantities as needed. Review the order details to ensure everything is correct and Dispatch it. Accept payment from the customer in cash or via a card machine and record it as Paid in Pakk. Ensure you have appropriate payment methods set up under Payment Methods: create methods like "Cash" and "Card Machine" and assign them to Invoice workflows and to relevant accounts (e.g. *Cash Asset Account" and "Card Machine Undeposited Asset Account"). You can email or print a receipt if needed.
In accounting and bookkeeping, 'locking' a period means that no new transactions can be entered in that period and no existing transactions can be edited. In practice, this is to ensure that once official accounting results (e.g. tax return, VAT return) have been filed in respect of a particular period, the figures simply cannot change.
Some accounting packages have formal 'periods' which run in parallel to the actual date of transactions. There might be different periods for VAT accounting and corporate accounting and they can be opened/closed independently.
The implementation of locking in Pakk is simpler - there are no 'periods' for you to set up, track and eventually lock. In order to stop transactions being entered/edited on the system before a certain date, you simply specify a lock journal to date in Account Settings > Accounting. If no date is specified, there is no lock on accounting entries. Once you specify a date, no changes to the journal (either manual or system generated) can be made prior to that date.
The journal lock is only accessible to account owners, which means that temporarily unlocking the journal (for example, to enter a missing transaction) cannot be done by anyone other than an account owner.
There are three main items that you have to get from your Paytriot account to configure it in Pakk: Merchant ID, Signature Key and Merchant Country Code:
You can obtain these from your Paytriot Dashboard
From the Developers section, grab the following codes and paste them into your Stripe config, which can be found in the "Payments" tab of your Pakk account config page (the little cog icon in the Pakk toolbar):
API Keys > Publishable Key
API Keys > Secret Key
Then, in the Webhooks section, click Add Endpoint to create a new notification endpoint for Stripe payments. In the popup, you need to enter the URL of your webhook, which is any domain pointed at your site plus /webhooks/stripe. So, if your site was at pakk.io you'd enter https://pakk.io/webhooks/stripe. Select the latest "version" and two events to send:
payment_intent.payment_failed
payment_intent.succeeded
Once you've created the endpoint, you can get a Signing secret from the webhook page you just created in Stripe - you need to paste that into your Stripe config in Pakk too.
Finally, again inside the Pakk Stripe config, choose your locale and select Enable.
Managing your orders, wherever they come from, is perhaps the single most important day-to-day task you perform within your all-commerce business.
Pakk is architected to support a wide variety of workflows and makes them simple to reason about, implement and manage.
There's something fundamental you need to know about sales orders (and this applies to purchase orders too) in Pakk. An order encapsulates its invoicing, dispatches and payments.
What do we mean by this? Simply that all invoicing information, the list of dispatches and the list of payments are stored within the order record. Some other commerce and ERP systems create separate records for each invoice, dispatch and payment, so you might be used to that workflow. Just keep in mind that Pakk keeps all this together, under the umbrella of the order.
You have a few options for reverting a Sale, depending on the exact nature of the reversion.
If you need to completely reverse the sale and don't need to 'preserve history', the sale can be completely cancelled. Although the cancelled Sale will be visible on the system, all corresponding Journal Entries will disappear, meaning the audit trail for payments would be gone. Furthermore, there would be no tracking/record of stock going out and coming back in.
Only use cancellations in the simplest case where a Sale is either entered erroneously or immediately reversed - for example, the customer changes their mind even before payment is made. Once payment is made and stock is removed from the premises it will always be more accurate/auditable to credit and refund.
Once payment has been made and the customer has taken the goods away, the process for taking stock back, crediting and refunding is essentially no different to the case where the originating sales transaction was an Order.
Use a Return to accept items back into stock. Although all the stages of the Return will not apply if the customer is returning the items in person, you have the full power and flexibilty of Returns to allow you to accept all items on the Sale, or only some of them, and choose whether they need to go back into stock or are going to be discarded.
Note that the
customerfield on a Return is optional, but you will probably need to create a record for a customer returning items if you are then going to credit them.
Creating a credit is a necessary next step, even if you intend to direectly refund the customer. By using a Credit you get the full power of the credit system, meaning you can either refund, or the customer can use the credit as full or partial payment towards a different Order
Note that customer credit cannot be 'used' on Sales, only Orders. This is because Sales are always considered 'Paid', so there is no possibility of applying credits.
If you intend to refund the customer, you'll need to create a Credit first, as described above, and then refund the Credit.
You may want to change fulfilment details on an order, for example, if a customer mistakenly chooses an incorrect shipping method (e.g., selects delivery instead of local pick-up, or next-day delivery instead of collection). In these cases you may need to update the Shipping Method and/or the Carrier fields inside a Sales Order to ensure the information accurately reflects the customer’s intended delivery choice and charges.
Shipping Method (Shipping Tab): This selection determines the delivery costs, estimated delivery times, and service type. For example:
If a customer intended to pick up locally in-store but mistakenly chose a next-day delivery service, you can adjust the Shipping Method to a local pick-up option to eliminate any shipping fees and reflect the correct delivery method.
Conversely, if the customer chose next-day delivery but you’re handling it personally for local customers, you might keep the original Shipping Method (next-day delivery) to maintain the expected charge and timing.
Carrier (Dispatches Tab): This field indicates who will actually handle the delivery or collection. If you’re fulfilling the order yourself, you can switch the carrier to "Local Delivery" for customers nearby, or set it to “In-Store Collection” if they’ll be picking up the order directly. This allows flexibility in how the order is managed without altering the Shipping Method (and thus, the original delivery speed and cost). Note that "Carriers" are set up on Account Settings.
You might be using an old version of the admin panel. Make sure to "hard refresh" your browser. The procedure is different for each browser, but normally involves "emptying caches" or something similar. Do a search for "hard refresh <browser name>" to find out how to completely refresh your browser cache.
The admin panel seems slow and/or seeing random visual bugs.
Tihs is 99% being caused by one or more browser plugins or extensions. Particularly extensions that try to 'parse' or change the contents of web pages cause havoc with the Pakk admin panel. As a short-term measure, try disabling all plugins, restarting the browser, then opening the Pakk admin panel. If it functions normally now, you know one or more plugins are causing the problem.
To localise which plugin or extension is causing issues, you'll need to start enabling them one by one until you've found the culprit. Once you know which plugin is causing problems, you have a couple of long term options:
Leave it disabled permanently if its not important
Set up a different 'profile' or similar in your browser which uses no plugins, and use that when you use your Pakk admin panel
Use a different browser specifically for Pakk (e.g. if you use Chrome normally, use Firefox for Pakk)
Find out how to disable plugins on a domain-by-domain basis and exclude your Pakk admin domain
It's to avoid bottlenecks and hogging of system resources. Plus, forces customers to download large documents is bad practice. Unless your PDF is truly huge, you can probably reduce it using a PDF editor tool, like PDF Expert (Mac), without visible quality loss. Your customers will thank you for it.
Make sure the account owner has correctly set up the dashboard in account settings. They need to make sure they have the correct URL and dashboard ID.
Make sure the account owner has assigned the dashboard to you in User serttings.
Logout and log back in again (or just refresh your login).
Make sure you are not blocking cookies. In Chrome, for example, go to Settings > Privacy and Security > Allow all cookies. Other browsers have similar settings available.


Pricing Schemes* as discussed above are an efficient way to reprice items on a site in relation to the sale price you have set on an item. The advantage of this technique is that you only have to maintain a single sales price and the pricing on your sites will always be tied to this price and simply modified upwards or downwards according to the Pricing Scheme.
The obvious disadvantage of this technique is that all the prices for all products on the site will need to be related to the sales price by the same percentage - e.g. a 20% discount, or a 30% markup.
If you need fine grain control over each product's price on each of your sites, you'll need to use product-level per-site pricing overrides. This allows you to specify an exact price to use as the sales price for an item on any or all of your sites. You can also choose to override an item's tax code on any particular site.
If you override a product's price for a particular site, that price will replace the sales price for that site only. Normally this is fairly easy to understand. For example:
a product has a sell price set of £100
you set up a site override to set the price on Website A to £50
the price displayed on Website A for the product will this be £50
However, the situation can be complicated when a site-overrides price has to combine with bulk discounts, pricing schemes and other calculated discounts. The best way to understand it is that when you override a product price on a per-site basis, you are effectively substituting the sale price for that site only - all further discounts will be then calculated from this new, overriden price.
This means that Pricing Schemes and Bulk Discounts based on percentage markups or discounts work well, but fixed price bulk discounts or web discounts won't make much sense. If you want your price override to 'inherit' the bulk pricing breakpoints and discounts you've set at product-level, select enable bulk pricing on the site override, otherwise bulk pricing will not be applied to the site-overriden price.
Not all customers are ready to buy straight away. Especially in B2B scenarios, having an efficient way to capture and process leads can form an integral part of your online and offline sales process.
forms to capture leads and bring them into the system. Here's how it works.Forms are a website-level entity, just like posts or pages - in fact, in many ways, they are just like a page in that they live at a particular URL and display customisable text to the user. Most of the same controls that pages have are available on forms: header customisation with colours and images, title and subtitle, SEO fields and body text. So, when creating a form, you are essentially creating an information page first and foremost. What should you include on this page?
a clear description of the advantage of registering
what will happen next, after registering
a catchy call-to-action
Forms offer a predefined set of fields and post-submission flows based on their type. Here are the form types currently available:
Wholesale Lead: creates a new customer record, marks as a 'lead', marks as 'wholesale'
Retail Lead: creates a new customer record, marks as a 'lead'
As well as the basic configuration, which is similar to that of a page, forms offer a number of additional setup options:
enable subscription: will show a checkbox allowing the lead to opt into future publicity. The text that is displayed next to this checkbox is customisable too, so be clear about why they might like to check the box and what you'll send them
thank you text: the message that is shown to users after they submit the form
email: a fully customisable email message that can be activated or disactivated, that is sent to users after registering. Use this as a first stage in the customer onboarding process.
Once you've created and configured a form, it's time to display it somewhere. The usual web enabled and websites fields are available to choose which webstores you want the form to apply to, so set those first. At this point, the form will be available at /form/{slug} (or the translated equivalent), so can be linked to from all the usual places: header menu, footer menu, homepage blogs, posts, pages...
Well, that's up to you. Pakk doesn't pretend to be a fully featured CRM, but the forms feature gives you the building blocks of a lead generation system that is totally integrated with the rest of your business and can help you turn leads into customers. In fact, in Pakk, leads really are customer records, they just have a different status because they have never placed an order. Once a lead places an order, they will no longer show as a lead. Here's how you might complete your lead pipeline:
set up the auto-email that is sent once the form is submitted to include useful onboarding information and a clear description of what will happen next
use the 'leads' list view in the 'customer' menu to keep a tab on leads that have registered and not converted
design an internal process to follow up with leads after a certain amount of time
use the in-built colour coding system to track leads through different stages of the pipeline
mark trade leads as 'wholesale' so they can be tracked separately
apply custom pricing schemes to leads that you want to have discounted prices
Once you’ve set up your Loyalty Program, all you need to do is select it on one or more sites by editing the Website (Setup > Websites) and selecting the Loyalty Program in General Settings > Loyalty Program. Once a Loyalty Program is selected on a site, the following features become active:
An automatically generated page (linked to from the footer) where the conditions of the Loyalty Program are explained in clear language to the user.
Messaging on product pages showing how many points can be earned by purchasing that product.
Message on product pages stating if the product is excluded from loyalty point redemption.
A new tab in the customer account area (for logged-in customers) where they can consult their loyalty point balance.
On previously placed orders, loyalty points earned/spent as well as loyalty discounts are shown.
In the cart, customers can choose to apply or save their loyalty points.
In the cart and checkout, the loyalty discount earned from applying points is shown.
In the cart, the number of loyalty points that could be earned from placing this order is shown.
In the cart, if the minimum order for using loyalty points hasn't been met, a message communicating this to the customer is displayed.
On the ‘Thank You’ page, after an order is placed, the number of loyalty points earned is shown.
Choose a catchy name for your Loyalty Program that works with your particular brand.
You might like to link to the autogenerated information page from other places (e.g., the auxiliary bar in the header).
Enter some introductory information to appear at the top of the autogenerated information page if there is something specific you’d like to communicate about your loyalty program.
Since all orders are subject to customers agreeing to Terms and Conditions, you should update your Terms with specific points regarding your Loyalty Program. You can use the information on the autogenerated page as a guide to adding to your Terms.
Note that you are free to set up as many Loyalty Programs as you need. Each can use different points accumulation and redemption values. Note, though, that a website can only have one active Loyalty Program at once, but a Loyalty Program can be active on many sites at once.
Consider the following distinct configurations:
A) Program-Per-Site: You set up one Loyalty Program for each of your sites. Points are accumulated for each site separately and cannot be cross-spent. B) Cross-Site Program: You activate the same Loyalty Program on different sites. Customers will be able to accumulate and spend points from the same 'pot' on any of those sites - sort of like how the Nectar scheme in the UK would allow you to accumulate and spend points at Sainsbury's and various other outlets.
Cross-Site Programs essentially turn your sites into a network of sites related by a common Loyalty Program, which can be a very powerful tool. However, you need to consider whether a common points-accumulation ratio and point-value are appropriate for your stores. For example, if one of your stores has significantly worse margins than the others, you might struggle to offer the same point-value discount on that store.
A Reconciliation is a 'draft' until it is Completed. You can save and edit a draft Reconciliation as much as you need to. Your aim is to bring the Reconciliation into balance: where all lines on the paper statement are correctly reflected on the system, implying a difference of zero. Once the Reconciliation is 'in balance' you will see a 'Complete' button. Completing a Reconciliation changes its status from 'draft' and makes it permanent on the system - you won't be able to edit it in the future.
Before completing a Reconciliation, make sure you're confident it reflects reality. In practice, if the 'starting balance' and 'ending balance' have been faithfully entered and you have reconciled to the point of zero difference, it is extremely unlikely for there to be any mistakes in your reconciliation.
Managing your customer service workload is easy and integrated in Pakk.
With details of customer service issues and enquiries living side-by-side with customer and order data, efficiently managing the flow of tickets is much more viable than if you were to use third-party issue management/customer service software.
Yes, you set your base currency once but can work with any other currency on orders and invoices, both on the purchase and sale side.
Yes you can, although in Pakk, the Sales Order currency has to match the Website currency.
However, there is an easy fix: Lets say you want to invoice a customer in EUR but your website is in GBP. You can just create a duplicate website and set the currency of the new site to the new currency (EUR). Then on the website tab of the SO you can choose as the source website the new website you have created and therefore the site and the SO currencies will now match. You don't need to make the website live for this to work. It should just be a couple of minutes.
You will have set up a number of ‘Payment Methods’ within your Pakk account. Each Payment Method has an associated ‘Flow’. The main flows are:
Credit card (via Stripe)
PayPal
Invoice
For example, you may have set up a Payment Method that you have called ‘Bank Transfer’. Since this is a ‘post-payment’ type method (I.e. you have to wait for payment to come in), this would be an ‘Invoice’ flow type Payment Method. Any Payment Method that allows the customer to pay after ordering (even if its just a few hours or days) has an invoice flow.
To make a Payment Method available on your store or stores:
Payment Method > Web > check Web Enabled and choose which sites
By default, any payment method you make available online will be available to all customers. For example, if you create a ‘Credit Cart’ method and make it available on a site, all customers will be able to use that method. Likewise, if you make a method called ‘Invoice’ (logically with an invoice flow), this would, by default, be available to all customers.
However, it’s unlikely that you want to offer credit to all customers, so you will probably want to mark any ‘invoice flow’ Payment Methods as ‘Customer Restricted’. This means that customers will only be able to see or use that Payment Method if they have been specifically allowed.
To specifically allow a customer to use a Payment Method:
Customer > Credit Management > Allowed Payment Methods > Add any Payment Methods you want to allow
In summary, by giving a customer access to a ‘restricted’ payment method with invoice flow, you are granting them the ability to pay after ordering (i.e. giving them credit).
List Views in Pakk are your day-to-day friend to view, edit, and manage your data efficiently.
List Views in Pakk are your day-to-day workhorse, providing a powerful tool to view, edit, and manage your data efficiently. They help you stay organized and productive by allowing you to customize what you see, perform bulk actions, and easily manipulate your data on a single screen.
List Views enable you to:
View and edit fields for multiple records on a single screen.
Perform bulk actions such as dispatching orders.
Customize and save views to display only the columns you need.
Sort, filter, and export/import data for better management.
Pakk provides various List Views designed for specific workflows, but you can customize these to suit your needs. Click the columns icon in the list view toolbar to open the customization options., You can check or uncheck fields from the available list to add or remove them from your view. If you are an account owner, you can save your custom view for future use. Give it a name and you will be able to access it anytime from the list views dropdown menu.
Sorting and filtering are essential features that help you organize and find your data efficiently.
Sorting
Click on a column header to sort the data by that field. Click again to toggle between ascending and descending order.
Filtering
Filters allow you to focus on the specific records you need. Here’s how to make the most of filtering:
Enabling Filters: Click the filter icon in the list view toolbar to turn on filtering.
Adding Filters: Select a field and set the criteria to narrow down your list. For example, you can filter orders by status or date range.
Stacking Filters: Add multiple filters to refine your search results even further. For example, you can filter orders by status and date range simultaneously.
Disabling Filters: Uncheck or remove individual filters to broaden your search.
Clearing Filters: Click the clear filter button to remove all filters and start fresh.
Filters are incredibly powerful for zeroing in on the exact data you need, making it easier to manage large datasets and perform targeted actions.
Editing directly within the List View saves time and simplifies data management. In Edit mode, you can view and change multiple records within a single screen.
Editing Custom Attributes in List View
Custom attributes can have various types of values, such as text, number, choice, or true/false. To effectively work with custom attributes in List View ensure that you check the checkboxes for all custom attribute fields in the customization popup.
Bulk actions allow you to modify multiple records at once. In List View, select Bulk actions and you will get a dropdown of the available actions for that set of records (e.g., change stage, email, or print sales orders). Then select all the records you want to perform the action on, and click on 'Submit', that's it!
Exporting and importing data in CSV format is useful for large-scale updates and offline analysis.
Exporting: Click the export button to download your list view data as a CSV file. You have options to download only the visible fields, all required fields, or all fields . You can use the filters and list customisation options to export only the data you are interested in.
Importing: Use the import function to upload a CSV file with your updated data, ensuring it matches the required format to update records in bulk efficiently.
The ultimate price at which you offer a product for sale can be determined by quite a few factors in Pakk. This guide will help you understand how the different pricing features relate to each other.
From now on, all the flows we talk about will begin with a Customer Credit, so let’s get to know them in detail.
There are a number of basic facts you need to remember:
They always impact the customer’s account balance positively. If the customer was on zero, you now owe them money. If they owed you money previously, now they owe you less.
They do NOT impact stock - you need to also enter a 'Return' if you want to bring stock back.
They are required before a refund can be entered.
They can be applied in lieu of payment to Orders that are pending payment.
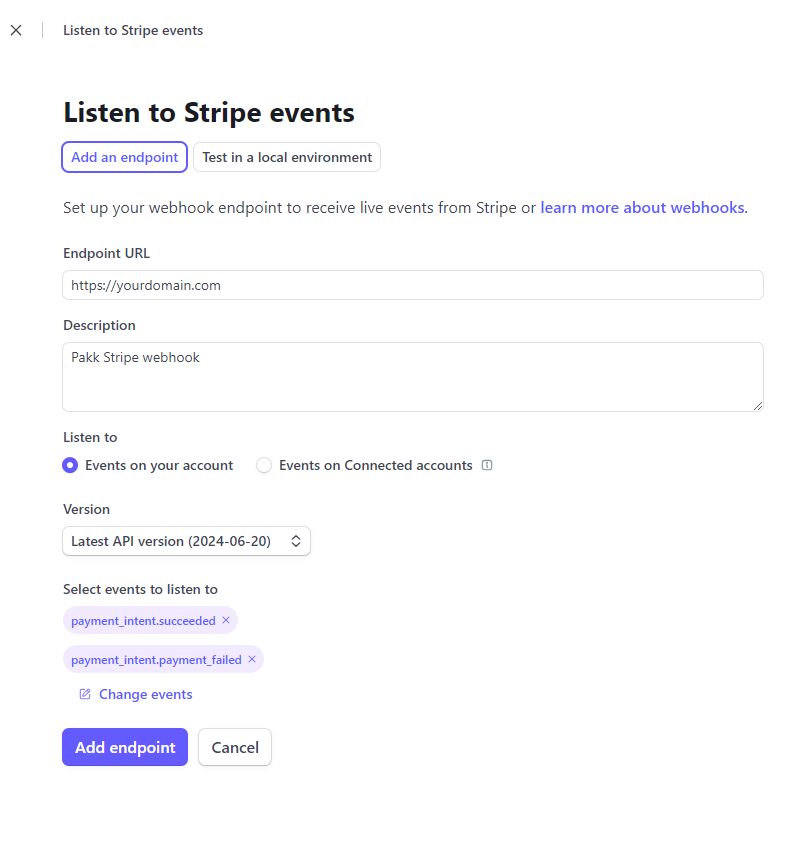
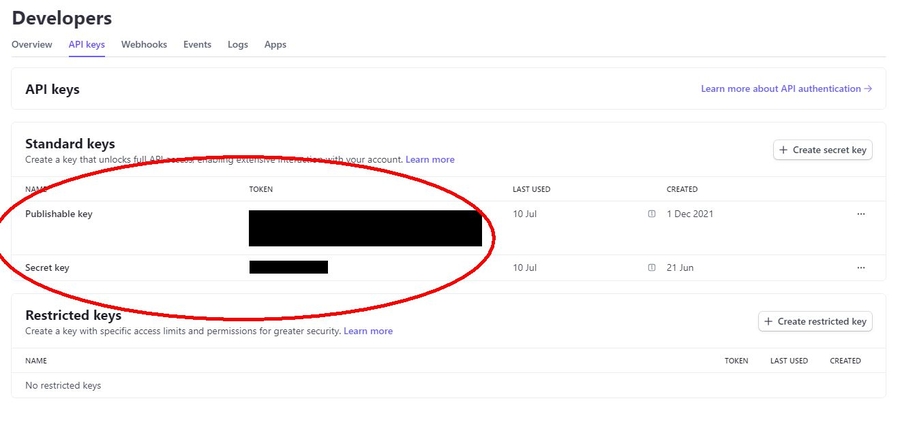
Part 3 of our "Admin Panel Tutorial Series" covering the basics of how to use the admin panel as well as some more advanced topics and workflow tips and tricks.
In this video we cover:
00:00 Sorting
00:52 Filtering introduction
01:39 Enabling filters
01:56 Stacking filters
02:15 Disabling, hiding and clearing filters
03:00 Combining filters with quick search
04:00 In-list editing
06:00 CSV export and import
07:43 Bulk actions
This video walks through various data management functionalities such as sorting, filtering, bulk actions, and more in a system that displays fields like SKU, name, and price. It explains in detail how to use these tools to search and manipulate data efficiently, as well as providing a brief overview of in-list editing, CSV imports/exports, and bulk actions. Below are the main points discussed, categorized by subheadings for clarity.
The video starts with a demonstration of sorting data by different fields:
Sorting by Price: Clicking on the field name (e.g., Price) sorts the items in ascending or descending order.
Other Fields: Similar sorting can be done for SKU and Name, allowing users to quickly organize data by any available field.
Filtering allows for more intricate searches. The user can apply filters to narrow down results by specific criteria:
Using Filters: Click the filter icon next to a field and apply conditions like “contains” or “starts with.”
Stacking Filters: Multiple filters can be applied to refine results further. For instance, filtering by "contains pasta" and "contains red" helps locate specific products like red pasta.
Enabling/Disabling Filters: Filters can be toggled on or off, hidden, or cleared entirely to return to the full dataset.
Quick Search: Filters can also be combined with a quick search for more complex data queries, making it easier to drill down into large datasets.
The video highlights the in-list editing feature, which allows users to edit records directly within the list view without exporting data:
Entering Edit Mode: Clicking "Edit" turns on in-list editing, enabling direct modifications to data fields like product names.
Autosaving: Changes are saved automatically when you move between fields, making it quick to edit multiple entries.
Efficient for Bulk Edits: This method is particularly useful for editing numerous items simultaneously without needing to export and re-import data.
The system supports CSV export and import for larger data management tasks:
CSV Export: Clicking the export button generates a CSV file of the current dataset, reflecting any filters that have been applied. It exports all fields, regardless of what is currently visible in the view.
CSV Import: CSV import allows bulk updates to the dataset. The tutorial advises exporting a sample CSV first to use as a template for re-import, ensuring data is correctly formatted before being uploaded.
Bulk actions are available for applying changes to multiple records at once. These are particularly useful for orders, customers, and other records that need batch processing:
Example: For orders, bulk actions like "dispatching" can be performed, allowing users to apply changes (such as setting shipping details) across several records at once.
Customization: Bulk actions vary depending on the record type, providing flexibility in how they are used for different datasets.
Sorting and Filtering: You can sort by any field and apply multiple filters to refine data views.
In-List Editing: Allows for quick, direct edits of multiple records without exporting data.
CSV Export/Import: Use export for large-scale changes and import data back in using a CSV template.
Bulk Actions: Apply actions like dispatch or status changes to multiple records simultaneously.
Sorting can be done by any field (e.g., price, name, SKU).
Filtering allows for detailed data queries and can stack multiple filters.
Filters can be enabled, disabled, hidden, or cleared.
In-list editing offers fast and automatic saving of changes.
CSV export includes all fields, reflecting any applied filters.
CSV import requires a prepared file; exporting a sample first is recommended.
Bulk actions enable changes across multiple records (e.g., dispatching orders).
Part 1 of our "Admin Panel Tutorial Series" covering the basics of how to use the admin panel as well as some more advanced topics and workflow tips and tricks.
A great place to start if you're just getting going with Pakk.
In this video we cover:
Main menu, auxilliary functions
User menu, login refresh, logout, language
Brand mode and brands
Documentation
Account settings, settings heirarchy
This video provides a detailed walkthrough of the main menu and auxiliary functions within an admin panel. The speaker demonstrates how to navigate user settings, manage brands, access documentation, and configure account settings, all while explaining the hierarchical relationships between account, brand, and website settings.
Login and Logout:
The user menu shows the email address of the logged-in user and the remaining time before automatic logout (typically 12 hours).
A "refresh login" button resets the logout timer to extend the session.
Users log in using a one-time code valid for five minutes.
Language Control:
This allows users to change the language of the admin panel without affecting other users.
Brand Mode:
The admin panel allows managing multiple brands. When a brand is selected, the interface displays information specific to that brand.
The logo and data, such as customer info or sales orders, are filtered according to the selected brand.
Users can switch between brand mode (focusing on one brand) and no brand mode (viewing all brands).
Brand Management:
Each brand has its own settings, including logos, that can override the general account settings.
In "brand mode," only brand-specific data is visible, making it easier to manage individual brands within a single account.
When not in brand mode, the system shows all data from all brands.
Account Settings:
Basic account settings like legal name, time zone, and currency are configured here.
These settings form the base level of the hierarchical structure, affecting both brand and website settings.
Hierarchical Overrides:
Brand-specific settings can override account settings for that brand.
Websites can also override both brand and account settings, providing granular control.
For instance, logos and other key settings can be customized at the account, brand, or website level.
Embedded Documentation:
The admin panel provides direct access to documentation and tutorials, such as pricing guides.
Users don’t need to leave the panel to access help resources, making it easy to reference instructions while managing the system.
Tags for Organization:
Tags are used to organize items such as images and products, ensuring consistency and avoiding duplicates.
Mini Apps:
The admin panel supports mini-apps, with the demand planner being one example for sales forecasting and purchasing. More mini-app functionality will be added in the future.
The admin panel's auxiliary functions are designed to help users efficiently manage multiple brands, settings, and documentation.
The interface offers a high degree of customization, allowing users to tailor settings at the account, brand, and website levels.
Direct access to documentation and organizational tools like tags enhances the system's usability.
User Menu: Login/logout options, session refresh, language settings, and brand mode access.
Brand Mode: Filters data to focus on specific brands; can switch between brand-specific and global views.
Account Settings: Hierarchical system where account settings can be overridden by brand or website settings.
Documentation: Embedded tutorials and guides directly accessible within the admin panel.
Tags: Used for organizing content such as images and ensuring consistency.
Mini Apps: Access to tools like the demand planner, with more functionality planned.
Part 4 of our "Admin Panel Tutorial Series" covering the basics of how to use the admin panel as well as some more advanced topics and workflow tips and tricks.
In this video we cover:
Error and warning colour coding
Custom colour 'stickers' for organisation
Details views introduction
Entity name and unique record identifier
Navigating the list from the detail view
Create new button
Action buttons
Print and email buttons
Common fields
Status/stage tags
In this system, color coding is used to signify errors and warnings across both list views and detail views. Key highlights include:
Yellow indicates a warning.
Red signals an error.
You can see this color coding in the list view, but to get the specifics of an error or warning, you must drill down into the detail view. For example, a record might show a warning for an open balance or an error if conflicting default addresses are set. These issues need to be addressed to clear the warning or error.
The system also features a customizable color-tagging system, inspired by physical colored stickers used in many businesses. This allows users to color-code records, such as customers or items, for easy organization and tracking. The color coding can be seen in both list and detail views, and is adaptable for various entities in the system, such as customers, items, or any other records.
Detail views (also referred to as drill-down views) provide a more granular look at a specific record, allowing you to access detailed information and take actions. To access a detail view, you click "View" from the list view. From there, you can navigate between records without returning to the list view using the navigation arrows, saving time.
At the top of the detail view, you'll see the entity name (e.g., Customer, Item) to remind you of the record type. Each entity also has a unique identifier, like an SKU for an item or a customer name for customer records. These identifiers are primarily internal and help keep track of records.
In addition to the entity identifier, there's a link back to the list view and arrows that allow you to navigate between records directly in the detail view. This makes comparing records more efficient without needing to return to the main list view.
You can create new records either from the list view or within the detail view via the Create New button. This button takes you to a screen for creating a new record for the current entity type you're viewing (e.g., customer, item).
In the detail view, action buttons like "Edit" and "Duplicate" allow you to manage the record. The "Duplicate" function is particularly useful for creating new records based on existing ones, saving time by pre-filling most fields. The system also provides specific buttons depending on the record type and state, such as "Clear Commitments" for sales orders when stock is committed.
On most records, you’ll see Print and Email icons. For example, in sales orders, the print function generates a PDF, while the email function lets you send the document directly to a recipient. You can customize the email content, choose a template, and send from a selected email address.
A set of common fields appears across most records in the system. These fields include information like creation date, modification date, and status (e.g., active, inactive). For transactions, you'll also see fields like currency or cancellation status, whereas non-transaction records like items will have slightly different fields.
Next to the record reference, you may see status or stage tags (e.g., "Committed," "Invoiced"). These tags quickly convey the current state of the record, providing a visual cue of important status information, such as whether a sales order is invoiced or a credit is refunded.
Yellow = warning, Red = error; seen in both list and detail views.
Custom color stickers can be used across entities for flexible organization.
Detail views provide in-depth information and actions for specific records.
Each entity has a unique identifier (SKU, customer name, etc.).
Navigation arrows help move between records without returning to the list view.
"Create New" and "Duplicate" buttons streamline the creation of new records.
Action buttons vary based on record type and state (e.g., "Clear Commitments" for orders).
Print generates PDFs, while Email allows customizable messages and templates.
Common fields show metadata like creation date and status.
Status/stage tags provide quick, visual information about a record’s current state.
Welcome to the Pakk Documentation homepage
Don't want to read long-form documentation? Get the most advanced and powerful help with our CustomGPT 'Pakk Expert'.
Pakk Expert can guide you through step-by-step tutorials to achieve almost anything in Pakk. Ask it for instructions, guides, tutorials, tips and tricks and converse with it to get exactly the help you need.
Search for 'Pakk Expert' in your ChatGPT account or copy-paste the following URL into your browser: https://chatgpt.com/g/g-chTUmiNGi-pakk-expert
The Pakk Docs are organised according to the following top-level groupings:
Account Setup
Suppliers and Purchasing
Customer and Sales
Account, Bookkeeping and Finance
Products and Inventory
Websites
Admin and Reporting
Data and Integrations
Use the main menu on the left to find the information you are looking for
Use the powerful built-in search (top right) to find specific information
Existing Pakk customers should submit a ticket using the 'Submit Ticket' link (opens a new email in your native email app) in the top navigation bar. Non-Pakk customers should visit and contact us via the form there, or by email.
A primer on how COGS is implemented in Pakk
One of the biggest advantages of having your accounting, stock management, order management, and website all running on the same platform is that stock valuation is tightly woven into the system, allowing 'live' tracking of COGS in contrast to entering COGS journal entries at the end of an accounting period as is the norm in less integrated systems.
If you’re an accountant, or especially experienced in accounting for physical product businesses, you probably don’t need to read this paragraph. Otherwise, this serves as a quick refresher and clarifier.
COGS stands for 'Cost of Goods Sold'. When thinking about business expenses, we usually imagine the simple case of buying some printer paper, for example, and logging an expense for that paper, say £20, in our accounting system.
But when you buy a big chunk of stock with the intention of selling it, you don’t normally 'expense' it in the same way. The 'proper' or 'formal' way of working is expensing the stock gradually, as you sell it. Here are some very simple examples:
I buy 10 units of stock at £10 each and sell them all for £20 each. I should record income of £200 and COGS of £100.
As above, but I sell only half of them. I would log income of £100 and COGS of £50.
In these simplified examples, the value of the COGS entry was obvious. In real life, tracking COGS is tough. It requires being able to trace back from each sale you make to how much was paid for that stock. Short of a fully serialized inventory, this is mostly practically impossible, so there are a few different accounting methods that let us get close enough.
In simple terms, whenever you make a sale, an accounting entry is created logging the COGS corresponding to that sale.
This is in heavy contrast to common accounting systems which force you to enter periodic entries by manually calculating COGS roughly according to the following formula:
COGS = Beginning Inventory + Value of Purchases During Period - Ending Inventory
This is where things get somewhat complex. The problem is that stock is often acquired at different prices at different points in time, and, again, unless you serialize your stock and know exactly how much was paid for each individual piece, there is going to be some 'mixing' going on. Take this hypothetical example:
I purchase 100 units of stock at £10 each. A month later, I purchase another 100 units, but this time prices have gone up and I am forced to pay £20 each. I now have 200 units, half have a value of £10, the other half a value of £20. The average value is of course £15.
Now suppose I sell one of these units. Presuming the stock is all mixed up and I don’t know exactly which unit I’m selling, how much COGS value should the system record?
£10? This assumes I’m selling from the first lot I purchased and would correspond to a technique referred to as FIFO (first in, first out).
£20? This assumes I’m selling from the second lot I purchased and would correspond to LIFO (last in, first out).
£15? This would just be using the average value.
All techniques are valid, and there are others. Which does Pakk use?
Actually, it’s not exactly any of the above, although it is a variant of the third approach. All stock in Pakk goes through the batch system. No stock is held outside of batches. This means that given the situation described above, the system would be tracking the two batches separately and would know from which batch any sale was made. This means that it could correctly ascribe either £10 or £20 to COGS.
The situation is only really complicated if the merchant chooses to receive stock into an existing batch at a price that is different to the average unit value that already exists on the batch. Imagine the above scenario but instead of keeping the £20 value purchased lot in a separate batch on the system it was mixed with the £10 value lot. In this case, the system does need to take the average.
Therefore, our approach is hybrid and could be described as ‘batch-based average COGS`.
If you read and understand the above, you’ll have understood 90% of how the COGS system works. Everything that follows dives a bit deeper and is mainly aimed at accountants, consultants, or tenants who really want to understand how things work under the hood.
Every batch of stock on the system has a corresponding value which is maintained constantly by the system, along with the actual stock levels like on hand, available, and committed. The average unit value is simply calculated from these numbers. For example, if a batch has 100 units and a total value of £100, the average unit value is £1.
Stock can be added to or deducted from the system via the following transactions:
Purchase Orders: the value of the incoming stock is taken from the purchase price on the order.
Stock Adjustments: the value is specified manually on each line of the adjustment (although the admin panel defaults to the average unit value of the selected lot).
Returns: the value is referenced from the average unit value on the batch to which the return is sent, the value is locked in at the point where that batch is chosen.
Sales Orders: the average unit value is locked in as soon as a batch is committed, the COGS entry in the journal is on the billing date (invoice or cash sale). This means that COGS lines up perfectly with revenue recognition. Note that this implies that COGS is not actually affected until an order is billed - the 'S' is COGS is important here: it is the 'Cost of Goods Sold' where sold specifically means 'on a billed Sales Order'. Unbilled Sales Orders don't count. It's also worth taking into account that COGS won't be impacted until the order line is committed - uncommitted lines, even on a billed Sales Order, won't appear in COGS yet.
Supplier Credits: if a lot is chosen, the system considers that the stock has been lost/broken/returned - the valuation is at the amount credited by the supplier.
Things get a bit more complex when multiple currencies are involved, which can happen if you purchase an item in different currencies and receive them into a batch that already has stock valued in a different currency. Rather than applying exchange rates, Pakk maintains the value in each currency. Here’s a worked example:
I buy 100 widgets at £1 each = £100.
I buy another 100 widgets at $2 each = $200.
I now have 200 widgets.
The average value is £0.50 AND $1.
Note that the different currency values are not converted equivalents - they are to be summed to understand the average value of each unit.
When selecting a batch on an order line (i.e., committing the stock), the current average unit value is referenced from the batch and stamped on the line. As long as no change is made to the line (item/batch/quantity), the stamped COGS will remain the same, irrespective of when the order is billed or dispatched. In other words, the stock value of each line is locked in at the point of commitment. This is significant because it means that the stock value is recorded at the time of commitment rather than either time of billing or time of dispatch. Why is this correct? Because batch value can, and often does, change between when stock is committed and when stock is billed or dispatched (for example, new Purchase Orders could be received into the batch in the interim period).
A pair of balancing journal entry lines are created on the transaction journal entry in the amount of the total COGS value from the order lines - i.e., the total value of the committed stock on the order.
The first entry line INCREASES the value of the default ‘Stock Committed Not Dispatched’ account.
The second entry line INCREASES the value of the default COGS account.
The date of these journal entries is the billing date of the order - if the order is unbilled, these entries are not made.
When stock is dispatched, the impact is transferred from the 'Stock Committed Not Dispatched' account to the main Stock account.
When you enter a stock adjustment, you also need to enter a value for each line.
This value can be in a single, or multiple currencies.
The system will initialise the input with the current value drawn from the selected batch, but you can override it if you need to.
Once entered, that value will not change, even if the value of the underlying batch does change.
A pair of balancing journal entry lines are created on the transaction journal entry in the amount of the total COGS value from the stock adjustment lines.
The first entry line INCREASES the value of the default Stock Asset account (assuming a positive stock adjustment).
The second entry line DECREASES the value of the chosen ‘Allocation Account’ (essentially, explaining the ‘reason’ for the adjustment, e.g., ‘Broken In the Warehouse’).
The date of these journal entries is the Stock Adjustment date.
In parallel, the actual impact on the system stock happens immediately.
When entering a return, you choose a batch for each line. The returned stock will be returned to this batch unless it is ‘discarded’.
When selecting a batch on a return line, the current average unit value is referenced from the batch and stamped on the line. As long as no change is made to the line (item/batch/quantity), the stamped COGS will remain the same, irrespective of when the order is received. A pair of balancing journal entry lines are created on the transaction journal entry in the amount of the total COGS value from the stock adjustment lines.
Accounts and stock are only actually impacted once the return is marked ‘received’.
The first entry line INCREASES the value of the default Stock Asset account.
The second entry line DECREASES the value of the default ‘Customer Returns’ expense account. This account is essentially a reverse-COGS account.
Discarded lines are accounted for separately in the default ‘Returns Discarded’ account, which is essentially a COGS account
The date of these journal entries is the Return date
In parallel, the actual impact on the system stock happens immediately
Both use the line value from the order/invoice.
Understand the various algorithms available for calculation of shipping charges
The simplest possible option is a fixed shipping charge - for example, 5 EURO. Whilst this is available in Pakk, it's not that useful normally. In most cases, we'll want to vary the charge based on some element of the cart/order. Pakk allows you to calculate shipping based on:
Total order weight
Number of items in order
Number of units in order
Order subtotal before tax
Order subtotal after tax
Once you've decided on what axis you want to base this shipping method, you need to decide exactly how to perform the calculation.
Per-item delivery surcharges are set at product level. If a product has a delivery surcharge of £5 set, then an extra £5 (per unit) will be factored into the total shipping cost, irrespective of the Shipping Method chosen. However, if, for a particular Shipping Method, you would like to NOT include per-item charges (for example, for a 'Collection'-type Shipping Method), you can exclude per-item charges.
Irrespective of which calculation type you choose, you can set a threshold for free shipping. This threshold will be activated as soon as the order value (including discounts, not including payment method surcharges) is equal to or over the threshold. By default, the threshold is the inc. VAT total, which is normally the right setting for retail sites. Trade sites might want to use the ex. VAT order total as the threshold, which can be achieved by setting free over is ex to true.
If you decide to offer free shipping, you'll also need to decide whether to free includes per item charges. If you set this option to true, then all item delivery surcharges will also be waived once the condition for free delivery is met. If this is set to false, then once the condition for free delivery is met, the main delivery charge will be free, but individual item surcharges will still stand.
The amount charged will either go up or down depending on the value of the axis (weight/order value etc). There are quite a few sub-options:
base amount, can be thought of the starting amount from where the rest of the calculation takes over.
over is the threshold for the linear calculation to kick in (grams, cents or units).
unit amount, how much extra to charge per increment of the axis once past the over threshold. If you set this to a negative value, then the charge will go down as the increment goes up
step size, the size of the increment you want to charge for (grams, cents or units); e.g. every additional 100 grams.
Example 1
We want to set up a shipping method which will cost 5 GBP for orders up to 20kg. After 20Kg we want to charge 0.20 GBP per Kg. Note that we specify weights here in grams:
axis = total order weight
base amount = 5.00
over = 20,000 (20Kg => 20,000 grams)
unit amount = 0.20
step size = 1000 (1000 grams => 1 Kg)
Example 2
We want to charge a basic rate of 10 GBP, but we want this to start going down once a customer spends over 200 GBP including VAT. In fact, we'd like it to decrease by 1 GBP for every 100 GBP spent. At 1000 GBP we want shipping to be free:
axis = order subtotal after tax
base amount = 10.00
over = 1000 (10 GBP => 1000 pence)
unit amount = -1.00
step size = 10,000 (10,000 pence => 100 GBP)
free over = 100.00
free over is ex = false (to use the **inc VAT cart value)
The amount charged will be determined by a list of band thresholds and a list of band amounts.
band limits is a list of where the cutoff for each band falls, specified in units/cents/grams (depending on whether you are using units, price or weight as the axis)
band amounts is a list of costs associated with each corresponding band threshold
Example 1
Charge in bands of 1 kg. Each band is obviously more expensive, but the difference gets smaller as the weight increases:
band limits: [ 1000, 2000, 3000, 4000, 5000]
band amounts: [ 10, 19, 27, 35, 40]
Setting up bulk (quantity) pricing allows you to offer cheaper prices for larger quantities purchased.
Bulk pricing is assigned on a product-by-product basis - to enable it on any particular product, check Sales > Enable Bulk Pricing.
Once you've enabled bulk pricing on a product, you need to set up one or more pricing bands. Pricing bands are made up of:
Breakpoint: the quantity threshold for this band to be met. The threshold is specified inclusive, so if you set, for example, a breakpoint of 50, the customer will get the pricing for that band when 50 of the item are in their cart, not 51.
Is Percentage / Percentage Discount / Discounted Price: You can set up the bulk pricing for the bracket in 2 ways: 1) specify a percentage discount over base price; 2) specify the actual price. The advantage of setting up the band as a percentage discount over base price is that the bands will respond to any changes you might make to base price without you having to manually reset the price on each band.
Must be multiple of: If you require customers to purchase in certain multiples, rather than in singles, to be eligible for this pricing band, enter the multiple here. How you set this multiple will also determine how the 'increase' and 'decrease' buttons on the cart controls work. For example, if you specify a multiple of 50, the 'increase' and 'decrease' buttons will increment/decrement 50 at a time. You should understand that this will limit the customer's ability to get an exact quantity into the cart that doesn't fit the multiple. If you don't need to force the customer to buy in certain multiples, just set 1. Also note that you should make sure your 'must be multiple of' setting is compatible with the breakpoint you've set. For example, if you set a breakpoint of 95 and a multiple of 50, customers will not qualify for the discounted price when adding 95 to cart because 95 doesn't obey the multiples requirement. In this case, the price shown will default to the item's standard sell price.
Once you've set up your breakpoints for bulk pricing you need to decide whether to disable single purchase. By default, customers will be able to purchase any quantity up to the threshold of the first breakpoint. For example, if your first breakpoint is 100 with multiples of 10, customers will be able to buy singles right from 1 unit up to 99 units. If you want to enforce purchase quantities starting at the first breakpoint (so from 100 in this example), check the box disable single purchase.
Note that bulk pricing actually changes the sales price on order lines (i.e., revenue recognised will be lower than at regular base price). This is in contrast to discount lines which are accounted for as an expense and don't decrease gross revenue.
The next “level” of pricing adjustment is achieved by the use of pricing schemes. Pricing schemes are pricing adjustments either upwards (a markup) or downwards (a discount), that can be applied at bo
When you create a pricing scheme, you supply the following information:
an adjustment amount, which can either be a fixed amount (not used often) or a relative/percentage amount (used more often). This amount can either be positive (a markup) or negative (a discount).
prettification, which rounds prices to a specified cents amount, like 5.99 or 6.45.
Pricing schemes are created and then applied. Without applying a pricing scheme, it will have no effect. To use it, you must apply it to either websites, customers, or both.
When applying a pricing scheme to a website, all prices on that website will be ‘transformed’ to obey the pricing scheme rules in relation to the products’ base prices. So, use positive schemes to increase website prices: for example, if your base prices are wholesale prices, then use a positive to scheme to markup to retail prices on a website. On the other hand, if your base prices are retail prices, then use a discount scheme to price website items for wholesale.
When applying a pricing scheme to a customer, only that customer will see the adjusted prices. Therefore if a customer with an applied pricing scheme is logged into a website, they will see prices accoring to their own applied pricing scheme, irrespective of the pricing on that webstore (i.e. customer schemes override website schemes).
Use customer-applied pricing schemes to create special pricing for certain classes of customers, like wholesale customers, preferred clients etc.


E-commerce and accounting integration can be a major headache. Pakk solves that problem.
As we’ve talked about in other articles - the integration of e-commerce and accounting is a real headache, especially for higher-volume merchants. Traditionally, there have been numerous approaches to the problem:
Create sales reports from your e-commerce software, give them to your accountant, they manually enter summary figures into their accounting software.
Export all transaction data from your e-commerce software, give the spreadsheet to your accountant, they import into their accounting software.
You maintain your own, separate, accounting software and either export summary or transaction level data from your e-commerce software and import to the accounting package.
You run a one-way or bidirectional sync between your e-commerce platform and your accounting software and attempt to correctly duplicate the data from your e-commerce platform in your accounting package.
None of these approaches are satisfactory. They stem from the fact that most e-commerce platforms only track a small portion of value movements in your business. Other movements of value - like inventory purchases, expenses, inventory returns, customer credits, customer payments and sundry expenses are all spread across other systems, if tracked at all.
Pakk tracks all value movements in your business - you don’t need any other software or complex integrations, and everything is always “in sync”.
In this article, we’ll briefly outline how accounting works in Pakk. If you’re unfamiliar with accounting concepts, you might want to pass this on to your accountant to read over and evaluate. From now on, I’ll assume some basic familiarity with concepts like these:
Double-entry bookkeeping
Journals, and journal entries
Currencies and exchange rates
Accounts, from an internal, accounting perspective
Account reports, like “Profit and Loss”, and “Balance Sheet”
You don’t have to use the built-in accounting. If you’d rather use your own accounting software, or your accountant’s software, you can use CSV export and summary reports to get data out of your Pakk account and then either manually type it into the other software or try to import it. We don’t recommend this, of course, because you’d be missing out on one of the huge advantages of Pakk - but it is, of course, a possibility.
To use accounting, check the ‘Enable Accounting’ box in Account Setup > Accounting. This will enable the “Accounting” section in the main menu as well as turn on automatic “system journalling” (more on that below).
“Accounts” are an accounting concept - sometimes mapping directly to real accounts like your bank account or credit card account, but often not. Think of them as a place where accounting value is tracked.
Accounts can be created, edited and managed in Pakk. Your list of available accounts is often called “Chart of Accounts” in formal accounting jargon.
By default, Pakk comes with a small set of predefined accounts. You can use them as-is or edit them or create completely new accounts and deactivate the default ones.
When you turn accounting on, you need to define default accounts for things like:
Sales income
VAT liability
Discounts
When setting up accounts in Pakk, every Account has a mandatory Type that determines its role in financial transactions. Account types are: Income, Expense, Asset, Liability, and Equity.
To organize your reporting effectively, you can use account attributes such as:
Account Codes – Assign unique account codes to facilitate structured financial reporting.
Account Categories – These are necessary to set up your financial reporting and help you grouping accounts. As a minimum, you can just mirror the account type names, but categories give you more granularity. For example, you can label some of your expense accounts as "Operating Expenses", "COGs", "Bank Fees", etc.
Journal Entries are the foundation of accounting in Pakk. Value movement is tracked exclusively via Journal Entries. This makes things easy to reason about: only Journal Entries impact accounts.
Journal entries are a fundamental of transactional accounting. They consist of lines of “debits” and “credits” that precisely represent the movement of value in your business and leave no room for approximation. In double-entry bookkeeping, journal entries must always balance - this means all movements of value are always captured.
For the record, we don’t use “credits” and “debits” in Pakk - we use positive and negative values.
invoicing a customer for an amount means they owe you that amount
Receiving a customer payment for an amount means they no longer owe you that amount and your bank balance has gone up
Being invoiced by a supplier for an amount means you owe them that amount
Paying a supplier means you no longer owe them but your bank balance has gone down
Selling some stock means you are liable to send that stock out
Sending some stock out means you are no longer liable to send it but your overall inventory value has reduced
Writing-off some expired products reduces your overall inventory value
Paying off a credit card bill means your bank balance reduces but your liability to the credit card company reduces as well
Paying an expense increases your credit card debt
Value, in accounting, is a bit like energy, it can’t be created or destroyed - just moved.
Every transaction in Pakk - sales orders, purchase orders, credits, inventory adjustments etc. - will create a parallel journal entry. These journal entries are created and maintained behind the scenes and there’s nothing you need to do explicitly.
These means all movements of value - relating to sales, stock, payments, expenses etc - are accurately captured in a single, double-entry bookkeeping system.
It’s key to understand the importance of having an integrated accounting system when we dive further into what is known as “Cost of Goods Sold” accounting. Because Pakk has a 360 degree view of your business, including purchases and stock levels - “proper” accounting can be done for purchases and sales. This means knowing how much stock you have and crucially, what it is worth, so that when sales are made, the fundamental “Cost of Goods Sold” account (COGS) can be adjusted in tandem with your Sales Income account and Inventory Value account. Pakk even takes into account value differences across batches of inventory (if you want it to). This type of accounting integration is what really marks out having a fulling integrated accounting/e-commerce system from a hobbled-together patchwork of solutions.
Sometimes manual adjustments need to me made - like stock or debt writeoffs. These can be done by manually entering a Journal Entry at any time.
Just as in any accounting system, expenses can be entered and assigned to any of your expense accounts in order to keep track of outgoings. Simple - but again, its all in one place, which just makes everything more streamlined.
Pakk allows transacting in any currency and transactions and their corresponding Journal Entries are always recorded in the original currency. This diverges from some other systems that record accounting/journal data only in the systems “base” or “home” currency.
In Pakk, you record your transactional data in the original currency. So if you make some sales in Euros and some sales in Pounds Sterling, your Sales Income account would accrue balances in both currencies. So account balances are always displayed in all currencies in which transactions have occurred.
Sometimes of course, particularly for formal accounting reporting purposes, you need to report figures consolidated into your companies “home” currency. This is easily achieved in Pakk via Exchange Rates. Exchange Rates can be entered into the system at any date and for any currency (rates are entered against the account’s base currency). It’s up to you how granular your exchange rate data is - you can update rates monthly, yearly or daily depending on your preferences and/or tax authorities requirements.
Of course you can download rates from online sources and quickly upload a year’s worth of exchange rate data in minutes!
Once you have exchange rate data in place, all reports can be output either with original currencies or with all currency amounts converted to the your base currency. When converting amounts, Pakk intelligently picks the best (closest) exchange rate from the ones available.
There are three principal ways to view and/or get data out of the system:
Account balances: if you just need to quickly view the current balance of any internal account, these are maintained and available right from the ‘Accounts List’.
Export Journal Entries: for advanced analysis and/or reporting, you or your accountant might want to export your Journal Entries. Journal export is a little different from export of other entities in Pakk in that we export the lines, (i.e. one line per account impacted), so you can then build really detailed spreadsheets over your granular accounting data.
Reporting: Pakk provides a variety of reports, including standard accounting reports like “Profit and Loss Statement”, “Balance Sheet” and “VAT”. Again, all these reports can be output with original currencies or converted currencies.
These could be thought of as offers or promotions. They are created and applied to a website and will apply on top of either the base price or any applied website or customer pricing schemes.
When creating discounts, you must then web-enable them and apply them to the one or more websites where you wish for them to apply.
Remember, web discounts will also apply to any manually created orders that are ‘linked’ to a source website by the administrator entering the order (choose the relevant website under source website).
Name and Description
Be sure to give your discounts attractive names and useful descriptions, as customers will see these in the website next to products that are included in the discount.
Products
You can specify a list of products which can act as either whitelist or blacklist in terms of which items the discount applies to. For example, if you list 5 products and don't check "Items is Blacklist" then the discount will apply only to those 5 items. If you did check "Items is Blacklist" then the discount would apply to all products expect those 5.
If you select the option to "require all products" then all of the specified products will be required to activate the discount.
Important! If you want to include all products in the discount, remember to leave the 'products' list empty and mark it as a blacklist (i.e. so you are excluding nothing)
Categories
You can also specify a list of categories, again as a blacklist or whitelist. Whitelisting a category will allow products in that category to apply to the discount, whereas blacklisting a category will mean that any products in that category will not be available for the discount.
Note that the 'category' restriction (whitelist or blacklist) works in conjunction with the 'product' setting described above, so products need to pass both the 'product' and 'category' filter to apply. If you only want to use the Category filter, then simply leave the 'product' list blank and set 'products is blacklist' (therefore including all products in the discount) - you'll then be able to use the category setting to control which categories are included or excluded from the offer.
Important! If you want to include all categories in the discount, remember to leave the 'categories' list empty and mark it as a blacklist (i.e. so you are excluding nothing)
Promo Codes
You can also choose to “hide” discounts under a promotion code. This means that the discount will not be announced on the website and shoppers will need to manually entere a promotion code in order to trigger the discount. If you want to do this, just enter a promotion code in the promo code field - otherwise the system will consider it an ‘open’ discount.
Single Use Per Customer
You can configure discounts so that customers can only use them once. You can see a list of discounts customers have previously used on their customer record.
Single Use Codes
Activation of the discount can be tied to "single use codes". You can give these codes to customers who enter them in the "Promo Code" field on the website in order to activate the discount. The catch is that once the code is used once it is "spent" and cannot be used again - either by that customer, or any other. You can combine these single-use codes with the above "single user per customer" option to make sure that customers can claim a particular discount only once, even if they have multiple codes (that's optional of course).
In order to use 'single-use codes you must check the option "Is Single Use" and then create individual codes in the "Single Use Codes" list. You can either create them manually - which is great if you want to create a code like "THANKS-FOR-YOUR-REVIEW" or "AN-OFFER-FOR-JON", or you can hit the "Generate Code" button as many times as you like to create random codes like 3jU8Rz or 5uT900. You can add as many codes as you like to the list, both manual and random, and they will disappear as customers use them up. You can always manually remove codes from the list too, if for some reason you need to remove access to a discount through a code you previously gave out. Be careful with that though - if you remove a code, no customer will be able to use it ever again (although you could easily manually add it back in).
Discount Accumulation
You can choose to make discounts non accumulable which will stop shoppers stacking multiple discounts on top of each other. The system defaults to a generosity heuristic when deciding whether to apply a non-accumulable discount or a series of accumulable discounts - basically meaning that it will apply the discount that is most beneficial to the shopper. This is designed to avoid situations where a customer would end up worse off when applying a discount.
Percentage Discounts
These adjust prices by a percentage, rather than a fixed amount - for example, a 20% discount.
Fixed Discounts
These adjust prices by a fixed amount, for example 10 EURO. With fixed discounts, tax calculation is somewhat complicated. You need to decide whether the fixed amount discount you are offering is the discount amount after the application of tax (a net discount, more useful in retail scenarios) or before the application of tax (more useful in a trade scenario). The system defaults to after tax, so if you enter a discount of 10 EURO then retail customers will get exactly that discount, irrespective of the tax rate. This is most often the desired effect.
Note that the fixed discount amount you enter is a unit rate - so it’s 10 EURO per unit. Again, this is most often what you will mean when you specify a fixed discount.
Fixed Single Discounts
In this case, the fixed discount amount you specify will apply only once, not per unit*. Use this calculation type to achieve discounts like "Spend over £100 and get £10 Off". Note that all other conditions attached to the way the discount works are the same (e.g. items/categories involved in the discount, accumulability, minimum spend).
X for Y Discounts
'X for Y' type discounts mean the customer gets X products/units for the price of Y products/units. For example, a common offer seen in supermarkets is '3 for 2', which means you get 3 units for the price of 2 (or stated another way, 'Buy 2, get 1 free'). Pakk allows you to create any variation of such an offer, for example '5 for 3', '5 for 4', '2 for 1' etc. Just set the 'X' value to the first number (i.e. the '3' in '3 for 2') and 'Y' to the second number.
Here are some of the finer points to take into consideration:
If you only add a single product into the discount, then the customer will need to purchase multiple units of that product.
If you add multiple products (or entire categories), then customers will be able to mix and match any of those products (including multiples of any of them) to get the discount. For example, if you make a '3 for 2' including Product A and Product B, the customer could get the discount by purchasing: 3 of A, 2 of A + 1 of B, 1 of A + 2 of B, 3 of B.
The discount uses the common 'lowest price item free' heuristic when applying the discount to groups of products with different prices.
It's probably best NOT to have a certain product appear in different 'X for Y' discounts at the same time, as the results would be unpredictable. If you choose to do this, make the offers 'non accumulable' so they don't step on each others' toes.
'X for Y' discounts can get pretty thorny to calculate/understand when the customer is claiming the discount multiple times on an order where lots of the included products are purchased in multiple combinations and quantities. The algorithm is programmed to be 'generous': it makes sure that the customer could not have done better by splitting their purchase into multiple carts in order to get a bigger discount (in order to avoid a customer complaining that 'if only I had bought the products 3 at a time, I would have got a bigger discount).
Order-Level Restrictions
Minimum Order Value
This is the minimum subtotal value on the whole order that is necessary to activate this discount. Use this control to create discounts of the type "Get £10 off when you spend £100 or more". By default this minumum refers to the order 'inc VAT' subtotal, but for trade/wholesale sites you might choose to use the 'ex VAT' total by selecting Minimum Orer Value is Ex Tax.
Discount-Level Restrictions
These restrictions all refer to subtotals of the lines included in the discount, rather than the whole order.
Minimum Units
For items included in this discount only, this is the minimum total number of units that need to be purchased in order to fire the discount. Use this to create discounts of the type "25% Off when you buy 3 or more Christmas products".
Minimum Items
Similar to the above, but instead of units, it counts "items". You could use this to create a 10% discount, for example, when customers try at least 3 different items from a new range.
Minimum Weight
Similar again, but this time the sum of the weight of the discounted products is the restriction. If you bulk sell a number of products and would like to offer a discount if a customer buys, for example, more than 10Kg, this is the way to do it.
Minimum Value
This is somewhat similar to the 'Minimum Order Value' restrictions, but only counts the value of the actual items in the discount, not the whole order. So for example, you could create offers like "Get 20% Off when you Spend £100 or more on Beauty Products".
This tutorial explains Payment Processing in Pakk
Pakk provides a versatile system for handling payments, integrating with several payment processors and offering various payment flows. Here is an overview of the available Payment Methods, how to configure them, their different workflows, and how they can be assigned to different accounts.
PakkPay is our preferred payment method, offering a simple and integrated solution for handling credit card transactions.
Other available payment processors include:
Stripe
PayPal
Paytriot
Viva Wallet
Payment methods in Pakk can be configured to support different workflows and assigned to different accounts. They can also be enabled on multiple websites or restricted as needed.
Link Each Payment Method to Appropriate Workflow
Each Payment Method has an associated ‘Flow’. These are either are the pay-now (credit cards or PayPal payments) and ‘pay-later’ ‘Invoice’ types. Any Payment Method that allows the customer to pay after ordering (even if its just a few hours or days) has an invoice flow; these include physical payments, whether by cash or credit card machine.
Link Each Payment Method to Appropriate Account
When setting up a Payment Method, you have to select a destination account. For example, you may have a 'Bank Transfer' Payment Method for invoices pointing to your main business bank account, but if payments are received elsewhere, direct them to the appropriate account. Payment processors often batch payments together and release funds every few days, and you might only deposit cash once in a while. How you manage these accounts is quite important and this is described in more detail in this section below: Payment Methods, Asset Accounts, and Reconciliation
Pakk allows for a flexible combination of payment method settings:
Web-Enabled Payments: Enable or disable payment methods for specific websites, allowing you to control which payment options are available on each site, or keep some payment methods completely offline.
Customer-Restricted Payments: Restrict certain payment methods to specific customers, ensuring that only they can use them.
Admin-Enabled Payments: Admin Panel users can use these methods to manually process an order for the customer within the admin panel.
When setting up a payment method in Pakk, it's essential to select the correct destination account for accurate tracking and reconciliation. This ensures that your financial records are up-to-date and reflect the actual flow of funds into your business. Here's how to do it and why it's important.
Destination Accounts for Payment Methods
For example, if you have a 'Bank Transfer' payment method for invoices, you would typically point this to your main business bank account. However, if payments are received through other channels, such as cash or credit card processors, they should be directed to the appropriate undeposited accounts.
Handling Payment Processors
Payment processors, such as Stripe, PayPal, and others, often batch payments together and release funds to your bank account every few days. This means you might not receive individual payments immediately but rather a lump sum covering multiple transactions. To manage this, it's important to create undeposited accounts for each processor. This helps in tracking pending funds and ensures that you can accurately reconcile your accounts when the funds are finally deposited into your bank.
Typical Undeposited Accounts to Create:
Card Machine Undeposited: For payments processed through physical card machines.
Stripe Undeposited: For payments processed through Stripe.
Cash: For cash payments received directly.
Why Create Undeposited Accounts?
Batch Payments: Payment processors release money in chunks. By directing transactions to an undeposited account, you can track what’s pending and what has been received.
Cash Deposits: If you only go to your bank to deposit cash once a week, the cash received throughout the week can be tracked in the Cash account until it’s deposited.
Reconciliation: Regularly reconciling these undeposited accounts with your bank statements ensures that your financial records are accurate. This involves matching the transactions in Pakk with the actual funds received in your bank account.
Steps for Setting Up and Managing Undeposited Accounts
Create Undeposited Accounts:
In Pakk, go to the accounting section and create accounts named Card Machine Undeposited, Stripe Undeposited, Cash, etc.
Direct Payments to Appropriate Accounts:
When configuring payment methods, ensure that payments are directed to the respective undeposited account. For example, set Stripe payments to go to Stripe Undeposited.
Record Batches and Deposits:
When you receive a batch payment from a processor, move the corresponding amount from the undeposited account to your main business bank account in Pakk.
For cash, periodically move the amounts from the Cash account to your business bank account as you deposit them.
Regular Reconciliation:
Regularly check your bank statements and reconcile them with the transactions recorded in Pakk.
Ensure that the amounts transferred from undeposited accounts match the deposits shown on your bank statements.
Example Workflow
Stripe Payments: Payments processed through Stripe are initially recorded in the Stripe Undeposited account. Stripe releases funds every few days, which you then move from Stripe Undeposited to your business bank account in Pakk when you see the deposit in your bank statement.
Cash Payments: Throughout the week, cash payments are recorded in the Cash account. At the end of the week, when you deposit the cash in the bank, you transfer the corresponding amount from Cash to your business bank account in Pakk.
In Pakk, you can manage Payment Methods by setting restrictions based on:
Customer Restricted: Allow specific Payment Methods for certain customers or groups.
Admin Enabled: Enable admin panel users to manually process orders using a particular Payment Methods.
Web Enabled: Control which Payment Methods are available on your web store.
You can combine these options to customize who sees what, like offering special methods only to certain customers online.
No, Pakk does not pre-load credit card payment processor logos to your account. This allows you to choose logos that best match your webpage style.
You can find credit card processor logos and credit card companies logos from various online sources. Find the ones that you like most, download them (SVG files are preferred) and upload them to Pakk. You can then use them as you wish as you configure your Payment Methods.
Instructions for common eCommerce scenarios
If the customer still wants the order:
Full Credit the order
Choose allocation account ‘Lost in Transit’
Duplicate the original Order
Apply the Credit to the Order
If the customer wants a full refund, including shipping:
Full Credit the order
Choose allocation account ‘Lost in Transit’
Fully refund the Credit
If the customer wants wants a refund, not including shipping:
Manual Credit the order
Add the lines that were damaged to the Credit
Choose allocation account ‘Lost in Transit’
Fully refund the Credit
If the customer wants wants a refund, including a portion of shipping:
Manual Credit the order
Add the lines that were damaged to the Credit
Add an ‘Other Charge’ line for the amount of shipping to credit (Note - your account administrator should have created this Other Charge already, see below)
Choose allocation account ‘Lost in Transit’
Fully refund the Credit
If the customer wants wants to leave the credit on account for next time:
Manual Credit the order
Add the lines that were damaged to the Credit
Choose allocation account ‘Lost in Transit’
How do I process a request for a replacement?
Manual Credit the order
Add the lines that were damaged to the Credit
Choose allocation account ‘Lost in Transit’
Create a new Order for the items that were damaged
Apply the Credit to the new Order
Here are a couple of scenarios. for example, to manage the return a whole order for refund, including shipping:
Enter and track a Return to bring the order back into stock
Full Credit the order
Fully refund the Credit
Or to manage the return of one item for refund, not including shipping:
Enter and track a Return to bring the item back into stock
Manual Credit the order
Add the lines that the customer is returning to the Credit
Fully refund the Credit
Manual Credit the order
Add an ‘Other Charge’ line for the amount of shipping to credit (Note - your account administrator should have created this Other Charge already, see below)
Fully refund the Credit
Perhaps you were passing by your client's and decided to drop the order yourself, so you want to refund the postage costs. For ad-hoc cases like this we can create an item of type Service, and call it, for example, ’Other Charge’ or ’Postage' which can then be used when needed.


Returns are common enough in e-commerce to warrant their own treatment in Pakk. Here’s a guide on how to manage the returns process, right next to all your other processes.
Returns are common enough in e-commerce to warrant their own treatment in Pakk. Here’s a guide on how to manage the returns process, right next to all your other processes.
The process starts by creating a new Return record on the system. Returns are linked to an underlying Sales Order (the order which is being returned). There are two way to create a Return:
Directly from the Sales Order that is being returned, by clicking the Full Return button
Manually, by going to Returns and clicking Create New
When creating a Return directly from a Sales Order, a lot of information will be transferred for you - the customer, address details etc, and particularly the line items. All dispatched items from the order will be reflected in the created Return. Of course, if the customer isn’t returning everything, you can edit the created Return to reflect what is being returned.
When creating a Return from scratch, you will have to choose the Customer and fill in line item details manually.
There are two places on a Return where you can log the reason:
Return Reason: the main reason for the Return. This is an internal field and the customer won’t see it.
Line Reason: if you need to make further notes on the reason for Return for each individual line, you can do that as well. These line reasons are visible to customers on some transaction PDFs.
Choose a Location from your predefined list of Locations to indicate where the goods are to be returned to. Choosing a location prefills the Return address, which will be used for paperwork like the authorisation and shipping label. You can also add contact details for the return which also appears on paperwork.
As well as choosing where the stock is being returned to, you can also set up detailed information about the return logistics:
Is the stock being collected from the customer?
When is it due in?
How is it being returned?
Tracking reference for the return
You’ll find all of these fields on the ’Shipping’ tab.
Indicate which items are to be returned and in what quantities. As mentioned above, you can also specify a more exact reason for the return of that line.
For stockable products, you will also need to choose a batch into which returned stock will go. You can use an existing batch or create a new one if required. Note that you can select from batches at all locations, not just the location chosen for the return - this is to allow for unlocated batches, as well as locations that might be physically adjacent where the return is going to one ‘Location’ but some of the stock will go to batches at a different ‘Location’.
The Location of the chosen batch is shown on the line, so you can make sure you’ve got the correct batch.
Return tags need to be set up at account level by an account owner. Once they are set up they can be used by anyone to classify, categorise and organise Returns. For example, you might create tags like:
Arrived too late
Damaged in transit
Expired stock
Statutory return
Tags can help you at the reporting stage to understand the main sources of returns in your business.
Returns have a built-in status workflow that looks like this:
In preparation → Pending Receipt → Received → Booked In or Stock Discarded
You can supplement the built-in flow with your own ‘stages’. Like tags, stages need to be set up by an account owner. You don’t have to use stages, but if the built-in statuses don’t reflect the granularity of your internal workflows, you can use stages to be more precise as your returns flow through your internal processes.
The initial status for a Return. This is the status of the Return up until you have authorised the return of the goods, informed the customer, prepared the paperwork etc. If the Return was created subsequent to a customer interaction through the Ticket system, you can link a Ticket to the return, allowing you to quickly move back to the Ticket system in order to communicate with the customer.
If you need to send paperwork to the customer there are multiple PDF templates available:
Customer authorisation: this template shows information about the return, including the reference, as well as a breakdown of items to be returned. It is suitable for the Customer to place into the returns box, or use as a reference for preparing their return (like a packing list).
Shipping label: if the customer needs to organise transport themselves, they can afix the shipping label.
If your warehousing is dealt with externally and you need to send a notification to them, there is a PDF available for that purpose too.
Once you’ve made the preparation for the return, informed the customer, notified the warehouse if necessary, organised the transport if required etc., you will want to mark the Return ‘Pending Receipt’.
As soon as stock is received by the warehouse, the Return should be marked ‘Received’ - this will not yet make stock available for purchase - it is an internal workflow step that logs that the goods have been physically received.
Your warehouse will probably need to check the goods before they can be put back into stock - this should happen now.
The final step in the Return workflow. Once your warehouse staff have checked the returned items, they will decide whether or not they can go back into stock.
There are three options:
The whole return is ok to go back into stock: click ‘Booked In’.
Some items are ok to go back into stock, but others need to be discarded: check the box ‘Discarded’ on the lines that are not going back into stock and click ‘Booked In’.
The whole return is to be discarded: click ‘Stock Discarded’
Stock levels of any item/batch are only impacted when the status of the Return is ’Booked-In’.
Returns with status ‘In Preparation’ and ‘Pending Receipt’ have no impact on the journal.
Returns with status ‘Received’ will create a journal entry which increments your default ‘Stock Returned Not Booked In’ with the value of the returned goods. The counterpart will be a journal line assigned to your default 'Customer Returns' account.
Returns with status ‘Booked-In’ will reassign the stock-value increase to your default ‘Stock’ account - the counterpart remains the ‘Customer Returns' account.
Return lines with status ‘Stock Discarded’ impact against your default 'Returns Discarded' account.
Note that both the 'Customer Returns' and 'Returns Discarded' default accounts are expense accounts designed to be netted against the main COGS account in income statements. Their net impact is on COGS, but the accounts are kept separate for visibility. Note that the these accounts do not record the financial impact of any lost income originating with any credit linked to the return - this is dealt with separately by the journal entry created should you also credit the order.
Welcome to this introductory guide to accounting, bookkeeping and financial control in Pakk.
Perhaps you’re an accountant whose client has started using Pakk, or perhaps you’re the person responsible for accounting and bookkeeping within your company and need a primer or refresher on the basics of accounting in Pakk. Either way, this guide is for you.
Pakk has built-in, double-entry bookkeeping designed to be used as the merchant’s primary accounting system in place of platforms like Quickbooks, Xero or Sage. The Pakk accounting system works in a similar way to accounting systems you might be used to, with a few possible differences:
A system of ‘parallel journal entries’ is used to distill transaction lines to accounting impacts. Transactions don’t impact the accounts themselves, they generate journal entries that do.
Debits and credits are simplified to positive and negative numbers.
There is no account hierarchy, account organisation is flat.
All accounts are multi-currency and record the exact amount in the source currency rather than translating to base currency. Conversion is dealt with at reporting time.
If you’re not familiar with Pakk, you might be wondering why your client has started using it and how it differs to other eCommerce/ERP platforms out there, so in this section we’ll try to outline the salient differences, mainly from an accounting and financial viewpoint.
The first and most important point is that Pakk is an all-in-one system. It is designed from the ground up to take care of bookkeeping and accounting without integrations into other platforms like Xero or Quickbooks.
One of the motivating factors in the design and conception of Pakk was to overcome the hard barrier between eCommerce platform and accounting platform that plagues most eCommerce businesses. eCommerce means a constant flow of purchases, sales, credits, refunds and adjustments. Most eCommerce business rely on a connector or bridge to move data backwards and forwards between their operational platform (like Shopify) and their accounting platform (like Xero). The problem is that these connectors rarely capture the full complexity of all eCommerce transactions and product movements. Pakk means an end to questions like:
Which system should have the up-to-date selling price of an item?
Which system should have the discounts and sale prices set up?
Which system should have the correct purchase price?
Which system should record purchases and supplier invoices?
Which system shows the correct amounts owed by customers?
Which system shows the correct amounts owed to suppliers?
Which system knows the correct value of stock on hand?
Which system knows the current COGS value?
Where do I enter payments from customers?
Where do I enter payments to suppliers?
Where should I write off damaged stock?
Where do I enter returns, credits and refunds? Will stock levels update?
In Pakk these are non-problems because there is only a single source of truth which is 100% up-to-date all the time as you conduct your daily business. Furthermore, Pakk is completely strict about value movements. There is no way to just ‘enter’ stock on the system, for example. Each value movement must be represented with a transaction (like a Purchase Order or Stock Adjustment), meaning that all value movements are journaled and accounted for.
First of all, accounting can be completely turned off. So make sure to ‘Enable Accounting’ on the ‘Accounting’ tab in ‘Account Settings’. There are a few other setup and high level choices to be made:
Account Currency: this cannot be changed once you’ve started to use Pakk, so make sure it’s correct from day 1.
Rounding Technique: rounding is complex and there are multiple ways to handle it. There are a couple of other guides which explain fully the differences between the techniques on offer. Be sure to read and understand those guides and choose the technique that best fits your business. This choice can be changed at any time, but there are some knock on effects, so it’s better to get it right from the start.
Lock Journal: locks the journal to a particular date so that no entries can be made before that date, nor can any existing entries be updated
Default Accounts: choose default accounts for many of the built in income, expense, asset and liability scenarios, like sales income or VAT on purchases.
Exchange Rates to Update: get automatic exchange rate updates for currencies that you commonly work with.
Accounting in Pakk is structured around Journal Entries, making it transparent and easy to understand. Only Journal Entries affect the accounts, nothing else.
Journal entries are created and maintained automatically and in parallel to system transactions. This means that when a transaction, like a Sales Order, is created, a parallel Journal Entry is also created to reflect the value movements of the transaction. Whenever that Sales Order is edited, the respective Journal Entry is updated automatically. You can view the Journal Entry for any transaction simply by clicking on the link to the Journal Entry from the transaction detail page. The following transaction types cause Journal Entries to be created/updated:
Sales Orders
Customer Credits
Purchase Orders
Supplier Credits
Returns
Expenses
Stock Adjustments
VAT Adjustments
Such system-generated Journal Entries are automatically maintained and cannot be manually edited. As you would expect though, you can create manual Journal Entries to impact the accounts for whatever reason, such as common accounting adjustments like recording depreciation, tax payments or ad-hoc corrections.
Journal Entries in Pakk work in a very similar way to Journal Entries in common accounting systems, with a few notable differences:
Journal Entries have a date which will dictate the impacting date for each line, unless that line overrides the main date.
There is no requirement for all the lines in a Journal Entry to be in the same currency.
When all lines are in the same currency, the system will enforce the Journal Entry to be in balance before you can save it.
If however, multiple currencies are present in the Journal Entry, it does not have to balance (in fact, the discrepancy represents the implicit rate of exchange) and it’s up to you to ensure you have the correct amounts for the different currencies.
We simplify debits and credits by using signed numbers - positive for inflows to an account, negative for outflows from an account.
Your chart of accounts is available under Accounting > Accounts.
You can create any new accounts that you need for internal organisation, rename existing accounts and potentially assign your accounts to default roles, like sales income or VAT on purchases (see Setup). Note that there is no account hierarchy nor account numbers in Pakk. You can simulate both by careful account naming, for example “Expenses:Warehouse:Electricity”.
A key difference between Pakk and some other accounting systems is that all accounts in Pakk are multi-currency - they allow journal entries in any currency and maintain separate currency balances. Another way to think about it is is to treat each account as multiple ‘virtual’ accounts, each with its own currency, for example “Sales Income [GBP]” and “Sales Income [EUR]”. This philosophy means that translation to account base currency is done at reporting time, rather than when amounts are written to the journal.
For example, if your account currency is GBP and you make sales in both EUR and GBP, the Accounts Receivable will record and tally amounts in both currencies separately, rather than using the exchange rate on the day of each transaction to write only amounts in the base currency. Once of the advantages of this technique is that it negates the need for periodic ‘Exchange Rate Loss/Gain’ adjustments on Asset/Liability/Equity accounts.
Most accounting reports in Pakk allow you to see amounts either in original currencies, or translated to base currency for official reporting.
Exchange rates are used by the system to translate amounts to base currency for reporting purposes. Exchange rates are entered and maintained within Pakk under Accounting > Exchange Rates. They can be entered as frequently as you want (e.g. daily, weekly, monthly) and simply require a date and a rate. One thing to note is that the rate is entered as BASE to FOREIGN, so if your base currency is GBP and the current exchange rate is 1.2 EURO per GBP, the rate is entered as 0.833.
If you’d like to forget about having to manually enter exchange rates, enter the currencies you use in Account Settings > Finance and the system will download daily rate updates.
One of the key benefits of an accounting system that lives right alongside the operational system is in stock valuation and particularly COGS. Here’s how this works in Pakk:
Stock valuation is at purchase price and is taken from the Purchase Order in which the stock was acquired (except in the case of Stock Adjustments, where you are required to specify valued). As all stock control is lot-based in Pakk, you can maintain different average unit values for the same product by splitting up stock receipts into different batches - this gives you very granular accuracy. If you don’t need such accuracy, you can just use a single batch for receiving and selling stock, in which case the average value will fluctuate as you purchase stock at different prices and sell existing stock (i.e. average cost basis, rather than FIFO or LIFO). You can always view average unit values and total stock value at both product and lot level, direct from the product detail page.
When selling stock then, the system will impact COGS with the exact value of the items being sold derived from the average unit value of the item/batch. In this way, COGS is maintained accurately and in real-time as you trade.
Pakk allows you to upload PDF documents and attach them right into the transaction to which they pertain. For example, you can scan and upload supplier invoices and attach them to the representation of that invoice in the system.
Standard financial reports like 'Profit and Loss' and 'Balance Sheet' are available in the 'Reports' section of Pakk. Describing how each is built is beyond the scope of this article, but it is worthy of note that Pakk takes the approach of automatically 'rolling up' account balances for Income and Revenue for the 'Trial Balance' report and likewise generates automatic entries for rolling up the current and previous financial year profits and losses in the 'Balance Sheet'. It is therefore unnecessary to manual zero out Income and Revenue accounts at the start of every financial year - nor do you need to make manual journal entries for Retained Profits.
A standard UK VAT report is included in the roster of financial reports. Again, a full description of how this report is created is beyond the scope of this article, but the following points are worth of note:
The VAT report is collated from transaction records, not journal records*. This is so that the VAT report has full access to each line transaction with its corresponding VAT code, VAT percentage etc, to allow the required level of detail in creating the VAT report.
Therefore, you should not make journal adjustments to VAT accounts (apart from quarterly roll ups to a 'VAT Return Liability' account) as they will not be reflected on the VAT Return
For logging quarterly PVA (Postponed Import VAT) statements, you should use 'VAT Adjustments' which are available under the 'Accounting' menu in Pakk
VAT codes that you create in Pakk can be marked with several options depending on their desired treatment in VAT Reports: reverse charge, Northern Ireland and/or 'Exclude from VAT Report' (for scenarios like purchasing from a non-VAT-registered merchant, which is technically different from both 'Exempt' and 'Zero-Rated'
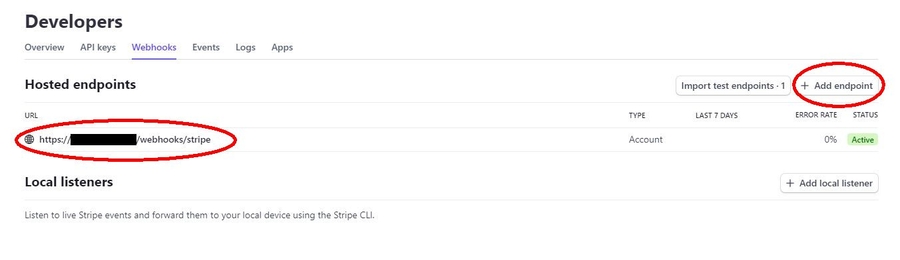
Tickets can be created in one of 3 ways:
Via a web form with a ‘TICKET’ workflow. This is a standard Pakk Form that can be placed anywhere on your site
Via an incoming email to your customer service address (once forwarding is correctly set up)
Manually, in the Pakk admin panel, by a member of staff
The ‘cleanest’ way to capture Tickets is to use built-in Pakk Forms on your website. Forms are totally customisable and you can collect any extra information that might be pertinent to dealing with customer enquiries.
To create a Form to capture Tickets, just set up a Form in the normal way and choose one of the ‘TICKET’ workflows as the Form type. Note that when an enquiry comes in from an email address that the system doesn’t recognise, a new customer record will be created, this will be either a ‘retail’ or ‘wholesale’ lead, depending on which ’TICKET’ workflow you choose.
You are not limited to just one Ticket Form, you can create and place as many as you like according to your own requirements.
The ‘Help Widget’ is little floating dialogue box that appears in the bottom-right corner of your websites (if enabled). Its purpose is to allow customers to search all the help resources on your site (posts, pages and FAQs) and contact you if they don’t find what they are looking for.
To configure your ‘Help Widget’, go to Setup > Websites > {site} > Website Pages > Help Widget and set the follow options:
Enable Help Widget: check this box to enable the widget, otherwise it won’t show
Starting Content: highlight any important articles you want to be automatically suggested before the customer even starts typing their search term
Include Delivery/Contact Page in Starting Content: choose to add in these automatically generated pages into the starting content listed
Enable Contact Us: allow customers to open a Ticket directly from the Help Widget if they don’t find the content they are looking for
Contact Us Form: Choose which Form will be shown in the Help Widget when the customer wants to contact you. Remember to use a Form that has been created specifically for Ticket capture
Order of Displayed Search Results
The Help Widget content search uses an algorithm to try to surface the most useful content.
In general, it gives more weight (and thus places higher in search results) to results where the text match was found in the title or subtitle. It also gives priority to pages and FAQs over posts, as we expect those to be the most authoritative and important content formats. You can influence result ordering by manually adjusting the priority field on all these content types - higher values will cause those items be prioritised in the search results.
You can choose a form to embed on the built-in ‘Contact Us’ page, allowing customers to open a Ticket directly from that page (instead, for example, of having to email or call). In your Website Settings, just choose which form you’d like to embed.
Reconciliation is the process of verifying that the 'real' state of a physical account is exactly represented on the accounting system.
It is common to reconcile the following types of account:
bank
credit card
payment processor
It is possible in Pakk, however, to reconcile any Account on the system.
During a Reconciliation it is common to find small errors in the accounting system, either transactions that appear on the physical account statement that haven't been recorded on the accounting system or have been recorded incorrectly (e.g. wrong date, wrong amount), or transactions that have been incorrectly placed on the system and never really happened.
Once a Reconciliation is complete, you can be 100% sure that the system state reflects reality accurately. More importantly, once transactions are 'reconciled' they cannot be changed or removed, so you can be sure that no-one can inadvertently 'change reality' further down the line.
Part 5 of our "Admin Panel Tutorial Series" covering the basics of how to use the admin panel as well as some more advanced topics and workflow tips and tricks.
In this video we cover:
00:00 Intro
00:20 Documents
01:50 Audit Log
04:30 Message Queue and Log
07:28 Bulk Action Report
09:55 Memo Field
10:50 In-Field Help
This tutorial is the fifth in a series on mastering the admin panel. While previous videos covered the main functions, this "bonus round" explores some additional features that can streamline your workflow, especially when managing documents, audit logs, and message logs. It also dives into useful troubleshooting tools and handy tips for navigating the admin interface.
The Documents Tab allows you to attach and link relevant documents, typically PDFs, to various entity records like products, sales orders, or customer profiles.
Usage: You can link documents such as spec sheets or product guides to their corresponding records. For example, linking a spec sheet for a specific product or associating sales orders with relevant documents.
How to Link: You can either upload a new document or select one that already exists in the system. Once linked, the document can be quickly accessed by anyone looking at that record.
The Audit Log provides a chronological record of changes made to any entity within the system, offering a valuable troubleshooting tool.
Purpose: Tracks who made what changes, including the initial creation and any edits to records.
Usage: Especially useful for resolving disputes or tracking mistakes, such as proving changes to customer data, like a wrong address input.
Details: Each log entry includes who made the change, when it was made, and a breakdown of the edit. The raw code of changes can be accessed for more technical users.
Message logs store and track system-generated or user-sent messages related to different entity records (e.g., customer communications, invoices).
Types of Messages: Includes order confirmations, invoice emails, dispatch notifications, etc.
Message Queue: Messages are added to a queue before being sent, allowing for retries if an email fails. The system tries up to three times before marking it as failed.
Log Access: You can check the status of sent messages, including failed ones, which may fail due to reasons like an incorrect email address.
Bulk actions allow you to perform tasks on multiple records at once (e.g., dispatching multiple orders or printing shipping labels). The Bulk Action Report logs these actions and flags any failures.
Use Cases: For tasks like batch processing orders, dispatching, or bulk printing, these logs help track successes and failures.
Error Handling: If an action fails on a particular record, the report will indicate the reason, allowing for quick resolution.
The Memo Field is available across most entity records and allows for internal notes to be attached to records.
Usage: Add notes for internal purposes, such as reminders or clarifications between team members. These memos are not visible to customers.
Example: Adding special instructions for an order or clarifying issues that may arise with a product or customer.
In-field help offers immediate assistance on specific fields in the admin panel.
Availability: Fields with help are marked in blue and turn into a question mark when hovered over.
Usage: Click on these field names to get short descriptions and explanations about the field’s function. This is particularly useful for complex configurations like shipping methods or tax settings.
Documents Tab: Attach and link important files to any entity.
Audit Log: Track who made changes to records, when, and what the changes were.
Message Logs: Monitor system-generated and user-sent communications.
Bulk Action Reports: Log batch processes, noting successes and failures.
Memo Field: Add internal notes to any entity, not visible to customers.
In-Field Help: Click on blue-labeled fields to get immediate explanations of their functions.
This tutorial provides practical, often-overlooked tips to help you navigate the admin panel more effectively and troubleshoot common issues.
There are four main items that you have to get from your Viva account to configure it in Pakk: Source Code, Client ID, Client Secret and Webhook Key:
Viva Wallet supports two types of account: sandbox/demo account and production/live account. You create the accounts separately. When testing the integration, you need to create a sandbox/demo Viva Wallet account and enter its credentials in Pakk. When going live, you should go to the production/live Viva Wallet account and copy the respective live credentials.
Creating a payment source In your Viva Wallet select either demo or live. Go to "Sales" / "Online payments" / "Websites/Apps" and click "Add Website/App" . In the pop-up that opens, enter the source name, e.g. 'Pakk payments'. As Protocol choose HTTPS. In Domain name enter https://pakk.io????? and in Integration method leave Redirection/Native Checkout v2. Next, in both Success URL and Failure URL type payment-vivawallet-return.php In the For a perfect, one-shot approval... section below select all field and click Create.
After you add the source, copy the Code value (a four digit number) as this is the Source Code that you need to enter in Pakk.
Next, Go to "Settings" / "API Access", scroll down to the Smart Checkout Credentials section below and click Generate a pair of credentials. Copy Client ID and API Client secret and enter them in Pakk.
Webhooks The signing key for your webhook endpoints used by Viva to notify the Pakk server of incoming payments. This key is not directly provided by Viva and needs to be generated using the API credentials. The process is somewhat technical, so please ask us for help.
Select Enable and once you've finished testing, you can go Live.
The main item type that you will likely order from suppliers are those that will be received into stock and inventory tracked: stockable products.
When stockable products are placed on a Purchase Order, the 'On Order' quantity at product level (visible on the product drilldown page) will go up by the quantity on the purchase order. You'll also see the 'To Receive' quantity go up on the Purchase Order line for that product, indicating that those items are yet to be received.
You might also need to order non stockable products from suppliers: physical products that you buy, receive but then do not keep a count of. Anything bought in bulk, or perhaps supplies not intended for sale would fit in this category.
When placing a non-stockable product on a Purchase Order, you will observe the line 'To Receive' quantity go up, indicating that the item is pending receipt, and you will also observe the 'On Order' quantity at product level go up. In these ways, the behaviour is the same as for Stockable Products. You'll see how behaviour diverges further down the line, once we start receiving stock.
If you need to include supplementary charges or services on a Purchase Order, you'll do so by including non dipsatchable line items. These could be extra shipping charges that the supplier passes on to you, or perhaps ad-hoc services they perform for you. Non dispatchable items do not show any 'To Receive' quantity on the order line, nor do they show any quantity 'On Order' at the product level, since they can't be physically received.
This is not strictly a pricing technique, but composite products can be used to achieve something very similar to bulk or pack discounts.
Basically, composite products are "made out of other products". On orders, composites are transformed into their component members, along with any discount adjustment lines necessary so that the net price matches the advertised price of the composite. Here's a worked example:
You create Composite A which consists of 5 units of Stockable A
The price of Stockable A is 3 GBP
The price of Composite A is set at 12 GBP
Therefore, this represents an effective discount on the composite of 3 GBP (5 x 3 = 15 - 12 = 3)
When transformed on an order, a discount adjustment line will be created in the sum of 3 GBP so that the net total is 12 GBP (the quoted price of the composite)
If you need to create quantity discounts for different bulk amounts of a product, you can therefore use Composite Products, varying the number of units and the net price to achieve the discount you are looking for.
The concept of 'billing' doesn't apply to Sales in the same way as it does to Orders. Sales simply generate a receipt most of the time, but can be invoiced on request.
If a customer requests an invoice on a Sale, you can 'invoice' it after the fact. This will simply generate an invoice number (Sales have their own invoice numbering sequence distinct from Orders) and you will be able to print out an 'invoice' PDF.
Customer is required in order for an invoice to be generated
Invoices are always paid (remember that the concept of 'payment' doesn't apply to Sales - they are always paid)
It follows that there are no terms nor due dates (because the invoice is always paid)
You must enter a billing address in order to be able to invoice a Sale
You can also enter the customer's tax/VAT number, if that is required by your tax authority
In real life, 80% of the time dispatching an order is simple: one dispatch, all items. The final remaining 20% of the time can get really messy: multiple dispatches with different items in each dispatch, spread across an extended timeframe. Pakk allows you to capture both of these scanarios and anything in between with relative ease.
A 'Simple' Scenario
Consider an order that came through one of your Pakk webstores
Everything was in stock, so it was all committed at the same time the order was placed
As it came from the web and was for an individual without a tax reference number, it was cash saled and paid in the same moment
So, the current status of the order is Committed | Cash Sale | Paid
In other words, the order is just pending dispatch
Since everything is committed, everything can be dispatched in one go
Creating Dispatches Manually
In the above scenario, you would create a single dispatch for the order, on a specified date, with a specified courier and with an optional tracking number. You could create this dispatch manually (as you can do with everything in the Pakk admin panel), by creating a new 'dispatch' inside the order and adding the lines corresponding to the committed order lines.
However, that's a bit tedious and error prone (although the system won't allow you to dispatch stock that isn't on the original order, or uncommitted) and most of the time you'll only want to do manual dispatches for the small number of orders where different parts of the order are dispatched separately (perhaps on different days or with different couriers, or both).
Most of the time, you'll probably want to use the intelligent autodispatch function, which is a bit like the autocommit function we discussed earlier.
The system makes it easy to dispatch whole orders at once. You can use the Dispatch action directly from an order drilldown page, or you can dispatch multiple orders at once from the list view. In both cases, you can provide a dispatch date, carrier and separate tracking number for each order.
Automatic dispatch takes into account:
Whether a product is dispatchable or not (obviously it won't dispatch a service for example).
Whether a stockable product has been committed (it won't dispatch uncommitted stock).
If a product is non stockable - in which case it will just dispatch the whole line quantity (because no committment is needed).
In all cases, the quantity already dispatched
Workflow Tip You can use the autodispatcher several times on the same order, perhaps letting it do most of the work for the first (main) dispatch, then going in and manually removing a few lines that weren't dispatched first time round, then going back the next day and running the autodispatcher again to dispatch the remainder of the order.
Just like with autocommittment, don't be scared to rerun the autodispatcher - it knows what has already been dispatched and won't create a mess!
Order Dispatched Status
The overall dispatched status is derived from the dispatches on an order, and the individual dispatch lines on those dispatches. Only once everything that can be dispatched is actually dispatched, the order will show as Fully Dispatched - up until that point it will be Partially Dispatched if anything has been sent out, or Not Dispatched (not actually shown) if nothing has been sent.
As a visual aid, each line on the order shows the quantity dispatched as well as the quantity remaining to be dispatched, so you can quickly work out what is remaining on orders that are not fully dispatched.
Remember Non despatchable items types, like services for example, will always show 0 as both qty to dispatch and qty remaining to be dispatched.
Sales are much more limited in functionality than full Orders. This page explains the differences.
In general, Sales have the following limitations as compared to Orders. Remember that these limitations are designed to make Sales simpler and faster to enter for in-person sales.
Commitment: there is no concept of commitment on Sales. Once lines are added to the Sale and the Sale is saved, stock of those items are immediately impacted (i.e., reduced). It is not possible to have uncommited lines on a Sale.
Shipping: you cannot set a shipping address or charge for shipping on a Sale.
Dispatch: likewise there is no concept of a 'dispatch' on a Sale - items are considered to have been removed from stock and taken away by the customer immediately. For this reason, you cannot enter a shipping address.
Payment: there are no 'Payments' on a Sale - the system considers the full amont to have been paid by the customer and routed to the relevant account of the selected payment method.
Billing: Sales, unlike Orders, cannot be in an 'unbilled' state (meaning they are neither cash-saled or invoiced). By default, a Sale is a cash-sale/receipt. You can 'upgrade' a Sale to be invoiced if the customer specifically requests an invoice.
Before understanding the order workflow, you need to understand item types - what they are and how they are related to orders.
Most often, items are simply products and can be thought of as such - you create lines on an order and add items in varying quantities. Each order line is, at its heart, an item reference and a quantity (as well as some other meta data).
But items can be more "abstract" than simple physical products. They can be non stockable products or services or other charges, as well as a few others. All of these items can be put on an order line.
To understand the impact different item types have as we move through the order workflow, you need to understand the characteristics of each. Here's a summary:
Stockable Product (default)
Yes
Yes
A widget that you buy, store in your warehouse and keep an accurate count of inventory for.
Non Stockable Product
No
Yes
Screws that you buy in bulk boxes of 10,000, rebag and sell by approximate weight. You don't wish to count screw by screw!
Digital Item
No
No
A code for a video game that you send to customers by email after purchase.
Service
No
No
As well as furniture, you might also offer a "home installation" service.
Other Charge
No
No
You charge customers on an ad-hoc basis for special delivery methods that don't fall into your usual shipping methods.
Discount
No
No
A customer places an order by phone and although there they do not have special pricing (price scheme) or there are no current auto-discounts (web discounts), you decide to give them a 5 Euro discount because of the large order size.
As you can see, the last 4 items above all have the same stock "treatment" (they cannot be stocked or dispatched) - so the different type classification is for internal organisation purposes more than anything else.
Remember Payment status is independent of everything else. A customer may have paid an order with it being invoiced, committed or dispatched.
An order's paid status is affected by the payments that are recorded on it. Payments are generally either recorded automatically (e.g., credit card payment, PayPal), or entered manually by an administrator. An order can have any number of payments of different amounts and via different payment methods - helping to capture the reality of a multi-modal business where payment is not always made immediately on placing of the order.
Entering Manual Payments
This can be done either from the order drilldown screen, or for multiple orders at once from the list view.
Order Balance and Customer Balance
It's useful to be clear on how payments recorded on an order affect different balances in the system.
Outstanding balance is shown on the order and refers only to the amount outstanding to be paid on that order. In the case of overpayment, this number will be negative, and indicates that the customer has paid more than the invoiced order amount.
Mind Boggler Remember that technically the amount due on an order is the invoiced amount, not just the order total. This might seem a bit odd at first, but if an order is not invoiced, then it cannot impact balances (both order and customer balance). Therefore, if payment has been made against an uninvoiced order (which can and does happen), then the oustanding balance for both the order and the customer will be negative.
Customer balance is the customer's overall balance. In a typical B2C e-commerce business, that number will normally be zero as payment is taken straight away. In a B2B business that offers credit terms to customers, this number will usually positive, indicating that the customer owes you money.
Of course, payments on an order impact both that order's outstanding balance and the customer's overall outstanding balance.
Order Payment Status
So order payment status simply relates to how much of an order's invoiced amount has been paid. Like the other status axes, it can be fully, partially or none.
The Pakk Demand Planner primarily uses the sales data from your Pakk account as its source of historical sales data. There’s nothing you need to do to make that work, all the data is extracted in the background. However, we get that you probably have years worth of sales data from previous systems that you’d like to use with the demand planner.
That’s no problem - you’ll find the option to ‘Upload Historical’ data, which allows you to upload an unlimited history of sales from your legacy system or systems.
Historical data needs to be in standard CSV format with just 4 columns (no header row necessary): SKU, year, week, quantity. The sheet can contain as many rows as necessary, one for each “data point” which is a weekly sales number for a product
The SKU needs to match the product SKU as it appears in Pakk. The year is just a number with the full year, like “2019”. The week is the ISO standard week number, like 12 or 34. The quantity is just the number of units sold that week.
Your old system might not produce a report exactly like this, but you should be able to wrangle the data with Excel to get something workable. If you need help, just ask. You only need to do this once: after you’ve uploaded your historical data set, it is saved and combined with your live Pakk data forever more.
You should look at the demand planner as more of a musical instrument to be “played” rather than a piece of artificial intelligence that can tell you exactly how much stock to order with 100% accuracy
Pakk’s demand planner is a tool we’ve built to help with this task. It’s important to note that it doesn’t work completely autonomously - it’s a set of tools and controls that are designed to work in conjunction with, and enhance, expert knowledge about the business. It takes a lot of the guesswork out of the task, makes it more efficient, makes ordering quicker and less error prone and makes some of that ‘owner instinct’ available to everyone else in the business. To get the most out of the demand planner, you’ll need to learn to use it, rather than just creating orders from it with a single click. We often describe it as like playing a musical instrument, or flying an aeroplane - you’ll need some knowledge and practice before really getting to grips with it.
All demand planners rely on historical data to feed their models, and realities can change quickly, so you should use the demand planner as an interactive tool to do your ordering, combining it with the expert knowledge of your business that only you and your team have.
Invoicing works in an identical way to Sales Orders: there is no concept of Partially Invoiced; Purchase Orders are either Fully Invoiced or Not Invoiced. A Purchase Order is invoiced as soon as an 'Invoic' date is set. There are many more fields on the 'Billing' tab of a Purchase Order than on a Sales Order to reflect the larger number of pieces of information that one normally needs to log on a supplier invoice: like 'invoice ref', the supplier's legal billing details and payment terms.
Invoicing a Purchase Order will make your balance with that Supplier go up.
Again, these work pretty much exactly in the same way as Sales Orders. You can either manually create Payments from internal Accounts or you can quickly record a payment for the whole invoiced amount (or remaining amount if some payments have already been made) by using the Payment action button. Purchase Orders can have the status Not Paid, Partially Paid and Fully Paid.
Recording payments on a Purchase Order will make your balance with that Supplier go down.
Loyalty Programs are fully integrated into the built-in Pakk accounting system such that you will always be tracking, in real time.
The number of loyalty points that have been earned but not spent (points outstanding, a liability).
The value of discounts given through redemption of points (an expense).
Remember that the Pakk accounting system allows for multi-asset denomination accounts. In short, that means we are able to track accumulation of points directly in points value (i.e., without converting to monetary value). Since different Loyalty Programs that you might operate might have different point values, points from each Loyalty Program are tracked separately using their own ‘currency symbol’. This is why, when setting up a Loyalty Program, you are asked to specify a 4-character symbol. For example, if I was setting up a Loyalty Program for Pakk, I might choose the symbol ‘PKLP’.
Once you've set a currency symbol for Loyalty Program, you cannot change it. This is to prevent imbalances in the accounts through a change in the 'currency' denomination.
This tracking is achieved by including extra lines on Journal Entries where loyalty points are earned or spent. The exact mechanics are probably only of interest to accountants, but here’s a quick summary:
When points are earned, the liability account you chose when setting up the Loyalty Program is impacted (the liability increases, which is actually a negative entry).
The counterpart to this line is an equal and opposite entry in the ‘Points Distributed’ expense account.
When points are spent, the exact opposite occurs, i.e., the liability of outstanding points is reduced, as well as the ‘Points Distributed’ expense.
Also, when points are spent, another journal line is created which expenses the monetary value of the discount for which the points are exchanged.
The counterpart to this line is part of the top-line sales income that is recorded for the order.
Here’s a highly simplified worked example:
A customer places an order for £50 gross. They redeem 100 points for a £10 discount, leaving a £40 total which is paid. They earn 40 points on this order.
£50 sales income is recorded.
£10 discount expense is recorded.
100 points are deducted from both the points liability account and the points distributed expense account.
40 points are added to both the points liability account and the points distributed expense account.
Generally, all journal impacting around Loyalty Points is done via Sales Orders, but if you choose to manually adjust a customer’s loyalty balance (as described above), a Journal Entry recording the impact of that adjustment will be recorded on the system.
There are two main items that you have to get from your PayPal account to configure it in Pakk: Client ID and Secret:
You need to be able to access your PayPal Developer Dashboard. There may be some hoops to jump through before you can access this in your PayPal account - see their documentation.
Once you've got access to the developer dashboard, you should see there are two modes - "sandbox" and "live". These instructions work for both - once you're ready to go live, just switch from "sandbox" to "live".
In the "My Apps & Credentials" section, you should have a "Default Application" which was automatically created for you. If not, you might have to "Create App". Go into the "Default Application" and copy paste both the Client ID and Secretinto the correct boxes in the PayPal setup in your Pakk account setup.
Select Enable and once you've finished testing, you can go Live.
Once your program is up and running, there are several points to take into consideration when administering the scheme from day to day.
You can view customer loyalty point balances broken down per Loyalty Program on their Customer record (Website tab) in the admin panel in both detail and list views. Alternatively, you can consult report CU50 for a full breakdown of customers with outstanding loyalty point balances.
Manually Adjusting Customer Balances
Balances cannot be directly edited. If you need to manually make changes to a customer’s balance, click ‘Adjust Loyalty Balances’ and enter the adjustment you want to make.
You can remove loyalty points by entering a negative value for the adjustment.
You can impact ONLY the expiry date, without removing or adding points, by entering a zero-value adjustment with only a date.
Balance adjustment can be done in bulk (from the list view), making it much easier to port balances over from previous loyalty programs.
Every night at around midnight, the system 'purges' all expired customer points. This means that on very rare occasions, you might see a very recently expired customer balance that has not yet been 'purged' (but will be purged the following midnight). Customers, however, will neither see this balance, nor be able to spend it on your stores.
When purging expires balances, the system creates an equivalent Journal Entry that 'writes off' the unused points so that your accounting system is fully up to date regarding outstanding points. The 'write off' makes the following adjustments:
Your points outstanding liability is reduced by the number of written off points
Your points distributed expense is also reduced by the number of written off points
View information relating to loyalty point redemption/accumulation on the Loyalty tab.
Normally, the loyalty discount doesn’t recalculate when editing and saving an order.
Tick or untick ‘Use Loyalty Points’ to toggle between using or not using the Customer’s loyalty point balance against the order. Every time you do this, the loyalty discount will be recalculated.
If you want to manually recalculate the loyalty discount, click the circular icon next to the loyalty discount subtotal in the Totals pane.
The number of loyalty points that can be used on the order is shown under ‘Loyalty Points to Use’. If ‘Use Loyalty Points’ is ticked, then this is the number of points that will actually be used. If unticked, then this is the number of points available to be used.
Bear in mind that the maximum number of points that can be used on an order might be less than the customer’s full balance because (a) the order might not be big enough to use up all their points or, (b) if you are editing an existing order, they cannot use points accumulated on THAT order.
Both ‘Total Earnable Loyalty Points’ and ‘Loyalty Points Earned’ are shown. In the case of a fully paid order, the numbers will be the same. If the order isn’t yet paid, then the earnable points total can be used as a guide to see how many points would be earned if the order was paid.
Many of the same fields are available on Cart and Estimate records.
Remember that no points are actually spent or earned on either Cart or Estimate records; the totals are simply there for information purposes. Actual impacting will only happen when the Cart or Estimate is converted to an order.
Pakk is fundamentally different from other e-commerce platforms - that’s because it’s not an e-commerce platform at all, it’s an ‘all-commerce’ platform.
Rather than approaching e-commerce from a web-first angle, we attack it business-first. Pakk is built to run your entire operation, from purchasing, through order and inventory management, to bookkeeping and finance. No complex integrations or bridging software are necessary with Pakk because Pakk IS your system.
With all your data in one place, you can generate as many online stores as you like. You can create stores for different brands, geographic locations or groups of customers. You can create shops, catalogue sites, content and information sites, landing pages, forms, whatever you want - it’s all connected to the same account and takes minutes to fire up and configure.
There is no development to be done when you launch a new Pakk site, nor much design work. The process of site setup is a process of configuration, not customisation. Of course there are hundreds of settings you can adjust to get your site looking right and working according to your needs. You can even create beautiful page layouts with our block builder. But there is no low-level micromanaging of design elements, no coding, no HTML, no CSS, no Jasvascript, no templates, no themes and definitely no plugins.
We do hundreds of hours of research and implement best practices and optimisations for everything from checkout button placement, privacy policy wording and cross-device display. With Pakk, you’ll never have to micro-manage your site again because we solve all the issues and maintain your sites at platform level. Configuration over customisation means we can push constant updates and make continual improvements to ALL Pakk stores, even though they may look very different and be selling completely different products. As technologies and devices come and go, we do the heavy lifting of keeping your site bang up to date.
We can do this, because we build Pakk for a specific demographic: small-to-medium businesses that are selling physical products, both online and offline. We don’t make enterprise or all-purpose ERP software.
Pakk is for ambitious companies who are making, importing, buying and selling real, physical goods, perhaps with a single owner operator, or perhaps with 20 employees, perhaps shipping a few orders a day, perhaps a few hundred.
If you want a single end-to-end platform to run your whole physical product business with efficient, modern, connected online stores, Pakk is for you.
If you've never come across this terminology before, "stock committment" just means reserving the stock for a customer that has ordered it. If we didn't commit stock that was ordered then that same stock might be ordered by a different customer and you might be left in a situation where you didn't have enough stock to fulfil both orders.
It's best practice to commit all stock on an order pretty much immediately after it has been placed. Of course, there are many situations where this won't apply: for example, if a customer is placing an order to be fulfilled in two months time and you don't even have the stock yet. But generally, especially for retail orders coming from your webstore, you'll want to commit stock straight away. Pakk stores are set up to autocommit stock as soon as the order is placed, so no manual intervention is needed for incoming web orders.
Batch Selection = Stock Committment
Refresher Inventory tracking in Pakk always works through the batch mechanism. If you don't need/want to track batches for a particular product, that's fine - you just set up an
ALLbatch and use that. This system means that you can move fluidly between batch and non-batch tracking (or employ both at once for the same product) with zero friction, when and if you need to.
To commit a line on an order, you just choose a batch.
Lines without a batch specified are not committed.
Lines without a batch specified are therefore back ordered.
Lines with a batch specified are completely committed (i.e., all that line's quantity is committed).
A line is either committed or not commited - you cannot partly commit a line.
If you need to partly commit a line, then you just split the line out into two lines and commit one corresponding to the quantity you want to commit and leave the other uncommitted.
Line splitting is one of those annoying times when a rounding error can be introduced if the way the line split falls causes the total of the two lines to be different from the total of the original single line. In this case, use the adjustment fields in the total box to compensate.
Non Stockable Products
Non stockable products are not inventory tracked, therefore it makes no sense to talk about committing them. An order line for a non stockable product will not give you the option to select a batch.
Automatic / Intelligent Commitment
As mentioned above, orders flowing from your websites are committed automatically. To go into a bit more detail: when the order is placed, Pakk automatically runs its 'intelligent' batch picker over the order - attempting to choose and allocate batches according to some simple criteria:
Don't pick batches that have an expiry date and are expired!
Choose batches with the earliest expiry first
For batches without expiry, choose the oldest batch (FIFO)
The autocommitter will also intelligently split lines in the case that a line can only be partially committed.
Of course, for orders that are placed manually, you have access to the autocommiter both from the order drilldown page or in bulk from the 'Pending Committment' order list view. If you run the autocommitter on an order that already has committments, those will not be touched, only the uncommitted stock will be processed, so don't be scared to use the autocommitter on partially committed orders - you won't mess anything up! If you do happen to want to remove existing committment and have the autocommitter run from a fresh state, you can either remove specific committments by hand or remove all committments on an order by choosing the action 'Uncommit', either from the drilldown or list view.
Order Committment Status
The overall committment status on an order is derived from the status of the lines, taking into account non stockable products. If all lines (excluding non stockables) are committed, then the order is fully committed. If some, but not all, lines are committed, then the order is partially committed. If no lines are commited then the order is not committed.
If you are allowing credit on a regular basis, you may need automated controls to stop customers from building up excessive amounts due, On the Customer record, consider the following fields:
Credit Limit: if you want to put a cap on the maximum amount of credit to be extended to the customer, enter the amount here in your home currency. If zero is entered here, this is interpreted as ‘no limit’ not ‘a limit of zero’.
Override Credit Hold: if a customer is in breach of their credit terms but you want to allow them more credit, you can override the built in credit ‘holder’ by ticking this box. Use this with caution because it will allow the customer to accumulate more debt as long as it is ticked.
The system features automated blocking of orders from customers who are in breach of the their credit terms. The logic applied is quite complex, so we’ll summarise it below. First, however, we need to introduce one more control:
On your Account Settings (only account owners have access), you’ll find an option called ‘Customers In Breach of Credit Terms Cannot Order’. If ticked, this option will stop customers who are in breach of terms (over limit/overdue) from ordering at all, even if they are paying cash. This is the most extreme level of blocking and designed for use when you want to completely cut off customers that are not paying.
Here’s roughly how credit blocking logic works:
If ‘override credit hold’ is marked on the Customer record they will NEVER be blocked
If they are overdue they will be allowed to continue only if they are paying cash and you have chosen not to block cash sales from in-breach customers.
If they have no credit limit then they will not be blocked from accumulating more debt
If they do have a credit limit and are already over it they will be allowed to continue only if they are paying cash and you have chosen not to block cash sales from in-breach customers.
If they have a credit limit, are not already over it, but the current order would take them over it, they will be always be allowed to pay cash, but not credit (invoice flow).
On your online stores, these conditions are constantly checked as logged-in customers interact with your store and appropriate warning messages are displayed in the cart and/or checkout.
Note that customers' credit balances and credit holding logic operate at 'account' level, not at website level. Therefore if you have multiple websites that customers can buy from, credit holding will be effective on all sites. This may be surprising to customers as when they are in their account centres, they can only see invoices relating to that site, so might be unsure where the 'rest' of the balance comes from.
In the admin panel, most of these conditions are displayed as warnings to the admin user, but saving an order will fail if a credit block kicks in. Remember that you can always set a customer to ‘Override Credit Hold’ if you want to force an order through, but obviously this should be done with caution and judgement.
5-part video tutorial series on the admin panel for newcomers to Pakk


Before thinking about calculating charges for a shipping method, consider the availability of that method. You've got some powerful controls at your fingertips here.
web enabled determines whether this method is available at all on your websites. You might want to disable this if you are creating a method that only admins should be able to use.
websites: like everything else in Pakk, you can attribute this shipping method to none, one or any number of your sites. Remember: if you don't attribute the method to a site, it won't appear there
Restrict the countries to which this method is available by choosing countries. You can set this up as a whitelist (countries for which this method is available) or a blacklist (countries for which this method is not available; with the implication that it will be available for all others).
Within a country, you can restrict areas to which this method will be available by specifying postcodes tp match: again, this can be a whitelist or blacklist. See 'Postcode Matching' below for more details on how to lists postcodes for matching.
Restrict based on minimum and maximum values like order value ex tax, order value inc tax, number of units, number of items, weight.
Restrict based on a list of products that must be in the cart - you can even choose to restrict the shipping method if any other products apart from those you list, are in the cart.
Restrict based on a list of products that must not be in the cart.
You can specify postcodes on an "exact match" or "prefix match" basis. Note that neither are case sensitive, so it doesn't matter whether you (or the customer) enters the postcode with upper or lower case characters.
"Exact match" means that the postcode entered by the customer must match exactly the postcode you enter into the list. For example, if one of the postcodes you enter is "28001" then the only postcode that will match will be "28001".
"Prefix match" postcodes are entered with a "*" to signify the non-prefix part of the postcode: for example, if you enter "AB*", then all postcodes that start with "AB" will be matched. This is useful for most country postcode schemes where the first part of the postcode refers to the wider area, and rest of the postcode gets more specific.
Some countries use slightly more complex postcode schemes so matching may only be performed on a portion of the postcode. For example, for UK postcodes, only the fist part of the postcode is considered for matching (e.g in "NW1 5GY", only "NW1").
Once the order has been placed with the supplier and tracked through the administrative and logistics chain (which you can do easily within Pakk), the first action you normally need to do is a Receipt
We've already observed that non dispatchable products cannot be "received", so we can ignore those. For non stockable items, receipt is relatively simple - since their stock is not counted or tracked, they are simply taken off 'On Order' at product level and the line 'Received' and 'To Receive' levels update to reflect the fact that the stock has come in.
Receipt of standard, stockable products is slightly more complicated.
Remember All stock in Pakk is tracked through the batch system. All receipts of stockable products need to be assigned a batch.
Since all trackable stock in Pakk needs to be in a batch, batches must exist in order to be assigned to a receipt. You cannot receive quantities of stockable products without first creating a batch and then assigning a batch reference to the receipt line.
Thankfully, the process of creating batches and receiving stock into them is greatly sped up by the "intelligent" Receive action.
You can Receive a Purchase Order by using the action button on its drilldown page. Receive covers the most common workflow and can be supplemented by manually creating/editing receipts. It makes the following assumptions:
that all previously unreceived stock is being received
that it is being received in a single 'receipt'
that the full quantity of each line is being received
Of course, you can always use the Receive action to get 90% of the way there and then do some manual tweaking of individual receipts and/or receipt lines if not all stock was received as expected.
Receive does the hard work of creating batches for you, behind the scenes. Batches are created with a simple code based on the SKU of the product and timestamp and an optional expiry date is added if you supply one when executing the action. If you don't supply one, the system will assume that your products have no expiry date.
Expiry Dates When running the Receive action, quite a few batches might be created in the backgound, but you are only asked for one expiry date before executing the action. This expiry date will be used on all created batches. You can always go into the batch records afterwards and tweak the expiry dates if they are different for each product.
What if I don't track batches? Then just ignore the batch system! Stock quantity is 'aggregated' up to product level, so you can always see product availability directly on a product record with ease. The batch system will always be there in case you need to track stock at a more granular level.
Of course, the Receive action will not create batches for non stockable products and will ignore non dispatchable products completely.
Of course, if necessary, you can create manual receipts directly on the 'Receipts' tab of Purchase Orders. Just select the products that have been received and choose batches for stockable products (these must exist first). This can be useful if, say, only a very small part of an order has been received.
As mentioned above, Purchase Order lines reflect the 'Received' and 'To Receive' quantities as receipts are logged. Once all lines that can be received are received, you will see a zero quantity in the 'To Receive' field of each line and the order status will be Fully Received.

Orders have a status that moves along five independent axes.
committed
cash saled
invoiced
dispatched
paid
Aside from some specific, rare corner cases, these status "axes" are independent - an order could be paid but not committed, for example. This allows ultimate workflow flexibility - you are not forced to observe a linear path where orders can only progress step-by-step in one direction - but it does of course introduce increased complexity.
Again, aside from some corner cases, each of the above axes can be completed to a different degree: not at all, partially or fully. Again, this allows you to reflect the often messy reality you might be faced with in your day-to-day management where orders are in various complex states of being stock-committed, dispatch, invoiced and paid.
Terminology Tip: Statuses are displayed prominently on order drilldown pages, but with a few caveats. If an order is "not dispatched", for example, you won't see "not dispatched", we prefer to just leave out "not" statuses for clarity. If an order is "fully paid" for example, we just write "paid", for clarity.
Rounding in ERP systems is horrific. I’ve already written a long and boring post about VAT rounding which you’ll hopefully never have to read.
Hopefully you’ll never have to read this article either, but if you’re here it’s probably because you’ve noticed a rounding ‘discrepancy’ and want to understand where it comes from. If that’s the case, you should probably read Why don't my VAT totals add up properly first, as it lays out some groundwork with (almost) digestible examples, and it's actually quite entertaining in a nerdy kind of way.
This article is more of a practical manual about how rounding is implemented across Pakk and the practical implementations.
Since December 2021, Pakk has supported ‘precise prices’. What does this mean? Prior to December 2021, all prices and monetary values where represented, stored and presented only to the nearest cent. That meant that £2.58 was representable, whilst £2.584 was not.
Whilst this is fine in 99% of use cases, there are some industries and products that require greater, sub-cent, precision - particularly for logging supplier purchase orders and invoices.
So in December 2021 we introduced higher precision prices. The new way of representing monetary values allows for us to 6 numbers after the point (which means an extra 4 decimal places of precision on top of regular cents). For example, £4.123456 can be represented in the new system without any rounding. Prior to the change, this amount would have been represented as £4.12.
The introduction of the ability to represent very precise monetary values had a big impact on rounding in the system. Prior to the change, all calculations always resulted in a rounded cent amount with only 2 numbers after the decimal point. VAT calculations, percentage discount calculations etc would all yield “real” monetary amounts (by real I mean a normal amount like £2.56 that can actually be charged and collected from a customer - you wouldn’t be able to collect £2.564, for example).
With precise representation of monetary amounts, the decision of where rounding should take place rises to the surface in a surprising number of areas and the resulting complexity can be hard to get one’s head around.
As of March 2023 we support configurable rounding methods. The available methods are as follows:
Line (default): This is the method that we've used exclusively up until now. Essentially it involves rounding at line level.
Transaction: The 'latest' possible rounding method we support. Basically it means rounding the transaction inc. VAT total.
Unit: The 'earliest' possible rounding method we support. Here we round the unit inc. VAT price.
Here's the precise mechanism:
Calculate the line Ex. subtotal
Round that
Calculate the amount of VAT
Round that
Add the (rounded) line Ex. to the (rounded) line VAT for the line Inc, which is rounded by definition (because it is the sum of two rounded amounts).
The advantage of this technique is that all line amounts (ex, VAT, inc) are 'real' amounts, which means that all amount filtering down through the system (think reporting, accounting etc) are 'real' amounts and you can basically forget about rounding from then on. It's also a fairly 'balanced' rounding technique in that it's 'late' enough that you don't get large compounding errors for transaction lines (the maximum rounding discrepancy per line is half a penny/cent).
The chief disadvantage of this technique is that there are sone Inc. VAT prices that are impossible to achieve when a single unit is purchased. For example £69.99 Inc. VAT where VAT is 20%:
The Ex. price would be £58.325 (Note that this is no problem for the system to achieve).
On a single line transaction: 1 x £58.325 is the line Ex. which gets rounded to £58.33
This means that the line Inc. is £70 instead of £69.99
Note that if two units are purchased: 2 x £58.325 = £116.65 x 20% = £139.98 which is correct (i.e. it is equivalent to £69.99 x 2)
Here is the precise mechanism:
Round the final transaction Inc. VAT total
Account for any rounding discrepancy (i.e. Rounded Inc. - VAT - Ex.) by writing to internal 'Rounding Adjustment' account
The main advantage of this technique is that because rounding is left to the very end, the maximum discrepancy is half a penny/cent per transaction. This is the least possible amount of compounding error. In industries/businesses where transactions involve lines with a large quantity of low value items, this method can avoid comparatively large compounding errors.
It also have has the advantage that any pretty price (e.g. £69.99) can be achieved.
Note that the principal disadvantage of this technique affects companies selling to the public who need to present a rounded Inc. VAT price. Look at the following example:
A product whose Ex. price is £55
With a VAT rate of 17.5%, the Inc. price is £64.625, but the customer will be presented with £64.63
The customer expects to pay £129.26 for 2
But he will actually pay £55 x 2 x 17.5% = £129.25
The potential discrepancy here is mainly a function of the VAT rate and line quantity. For 'round' VAT rates and lowish line quantities, discrepancies are quite rare and are small when they do occur. We'd encourage you to run some simulations on a spreadsheet to see how it affects your products.
Here is the precise mechanism:
Calculate the unit Inc. price and round that.
Calculate the VAT amount based on the original Ex. VAT price and round that
Deduct the rounded VAT amount from the rounded unit Inc. price to arrive at a rounded Ex. price
This is a variant of 'unit' rounding that prioritises getting the tax 'right' by accounting for the rounding discrepancy by back-calculating the Ex. price. A worked example will be clearer:
A product is given an Ex. price of £58.325 in order to achieve an Inc. price of £69.99
Note that this number is already round, so no need to round it
The correct tax amount here is £11.665, which we round to £11.67
£69.99 - £11.67 = £58.32 - this is the new Ex. price
What has happened here? In essence, we have placed the 'burden' of rounding on the merchant rather than the tax authority? That's not the only way we could have done this adjustment - in fact there are two alternatives:
Place the 'burden' on the tax authority by rounding the original Ex. price and then calculating the tax by calculating Inc - Tax. In this example, the Ex. rounds to £58.33 which means the VAT is £11.66. The merchant gets a penny more revenue but the tax authority gets a penny less. This isn't a massive problem for this example, but for large line quantities on small prices, the difference can be huge and we don't think the tax authorities would be best please (in any case, we wouldn't recommend this rounding method for business like that).
Only round once and accept that Ex. + VAT will not precisely equal Inc. VAT (in the example above, this will be a half penny discrepancy per unit) and account for this internally in the 'Rounding Adjustment' account.
We don't like either of these options, which is why we choose to double round, give the tax authority the extra revenue and always have Ex. + VAT. = Inc.
The admin panel will let you enter prices to 6dp and will display enough numbers after the decimal point to faithfully reproduce what was entered. So, if you enter 3.2457 as the price of a product, you will see 3.2457 - not 3.25 nor 3.245700.
The admin panel gives you the option to see or 'hide' precise (unrounded) amounts. This is a per-user option that can be accessed in your personal user options (click on your email address in the aux bar). If you choose to 'hide' unrounded amounts, you will still see precision prices (e.g. purchase price, sell price) as its important for you to know when you've entered a precision price, but all other calculated amounts (e.g. line totals, subtotals) will be rounded for you. Note that this doesn't affect the underlying representation of the amount, just the way you see it.
We'd expect most users to keep the option to display 'precision amounts' off most of the time, as it's easier to just see rounded amounts. Toggling precision display on is mostly useful if you are trying to track down a rounding discrepancy you don't understand.
Remember, you can choose whether your site displays Ex. prices/amounts, Inc. prices/amounts or both in your Website Settings.
Ex. prices are always shown to their original precision (e.g if you enter £5.643, that will be shown)
Inc. prices are always rounded for display irrespective of the rounding technique your account uses. For example, if an Inc. VAT price is £69.985, it will be displayed to the customer as £69.99
Amounts in the cart and checkout (line totals, subtotals, grand totals) are shown rounded
By extras, I’m referring to the bits and pieces that get added into an order after the lines are subtotalled - so shipping, payment surcharges and discounts. The calculation of these amounts respect your account rounding preference setting.
In Pakk, you have the option to allocate incoming products to an existing batch number or assign a new batch number to each lot.
This decision depends on the product types you are dealing with:
Perishable Items: It is essential to track batches and their expiry dates properly for perishable items.
Non-Perishable Items: For non-perishable items, strict batch processing might not be necessary, but still beneficial for internal tracking.
Most businesses handle a mix of product types. Even if you don't strictly follow batch processing for all items in the warehouse, utilizing batches from an admin perspective is beneficial for internal product cost and value tracking.
Reasons to Use New Batch Numbers for Each Lot
Quality Control
Batches provide detailed records for quality control, making it easier to identify and address issues with specific batches.
For expensive items, where each product is ordered individually or the batch corresponds to a single item, the batch number functions as a serial number.
Inventory Management
Batches allow precise tracking of inventory, helping to maintain accurate stock levels.
They facilitate better inventory rotation, ensuring older stock is used before newer stock, which is crucial for perishable goods.
Ease of Use
Pakk supports auto-creation of batches upon receiving goods, reducing manual effort.
Batches can be created quickly in Pakk by selecting items and generating batches.
Accounting Advantages
Batches provide accounting advantages by maintaining accurate records of stock costs over time.
Not using batches can lead to calculating inventory costs based on long-term averages.
Using batches helps keep cost calculations accurate and reflective of actual stock value.
No Overhead
There is minimal overhead in terms of system usage. Batches do not significantly complicate the receiving and tracking processes from the admin user point of view.
Implementation Notes
Initial Setup
Create at least one batch per SKU initially to ensure accurate stock adjustments.
This initial batch setup is necessary regardless of whether batches will be reused or not.
Warehouse Practices
Encouraging proper rotation and usage of batches in the warehouse ensures better inventory management and quality control.
Even if not strictly implemented, maintaining batches provides significant tracking and accounting benefits.
Conclusion
Implementing and using batches in the inventory system is beneficial for maintaining accurate records, quality control, and efficient inventory management. Pakk supports easy batch creation and tracking, making it a practical approach for most businesses.